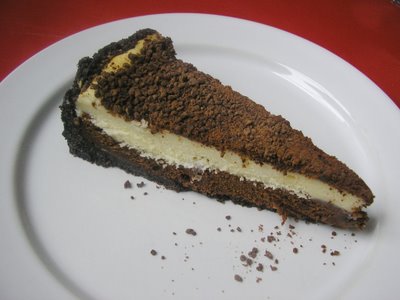
Monday, November 13, 2006

Chocolate Covered Cherry Cookies


These are some of the best cookies I've ever tasted. They're a Johnson tradition at all times of the year, but no Christmas is complete without untold dozens stacked in Tupperware bowls. The picture above isn't completely accurate, because we hadn't yet spooned the rich, fudgy topping on the cookies, but you get the idea.
Soft chocolate cookie bottom
Cherry in the middle
Fudgy chocolate on top

1/2 cup butter, softened
1 cup sugar
1 egg
1 1/2 tsp vanilla extract
1 1/2 cups all-purpose flour
1/2 cup unsweetened baking cocoa
1/4 tsp. salt
1/4 tsp baking powder
1/4 tsp. baking soda
1 10 oz. jar maraschino cherries (reserve some juice)

Cream together butter, sugar, egg, and vanilla. Add remaining ingredients and blend for one minute. Shape into one-inch balls and place one inch apart on ungreased baking sheets. Make a thumbprint indentation in each ball. Cut cherries in half and place one half in each indentation, cut side up. Prepare frosting and use immediately.

Frosting
1 cup semisweet chocolate chips
1/2 cup sweetened, condensed milk
1/4 tsp. salt
1- 1 1/2 tsp. reserved cherry juice

Mix together and carefully melt in microwave or on stovetop, stirring often to avoid scorching. With a teaspoon, generously spoon a heaping swirl of frosting over each cookie, and then bake at 350 degrees for about 8-10 minutes.

Pizza Dough

EDIT: I haven't used this recipe in a good, long time. We prefer the other pizza dough recipe on buildabelly, but if you prefer a thicker, puffier crust, use this one instead.

2 1/2 cups flour (I usually use all-purpose flour, but you can use a white/wheat mixture if you're a moral person.)
1 tsp. salt
1 tsp. sugar
1 tbsp. yeast
1 cup warm water
1 tbsp. oil

1. Combine salt, sugar, yeast, then add water and oil. Let sit for proofing ('til frothy on top).
2. Mix yeast mixture with flour. Turn onto floured surface and knead until smooth and elastic. (*At this point, I usually work more flour--about 1/2 cup-- into the dough as I knead)
3. Place in greased bowl, cover, and let rise in warm place until doubled in size. Punch down and pat into a roughly 12" circle on a cornmeal-dusted pizza pan or cookie sheet.
4. If I've planned ahead, I cover the dough with plastic wrap and leave it in the refrigerator for a few hours or up to 24 hours. The flavor improves greatly, and I like the texture better, as well. This last step really is the key reason for my liking this dough. (If you haven't planned ahead, bake immediately after placing toppings. More often than not, that's what I do...)

So there you have it.
Eat up.

Sugar-topped Blueberry Muffins


We broke into our first quart of summer-frozen blueberries on Saturday morning to make these yummy muffins for the second time ever. This recipe makes a very rich, indulgent muffin with a scrumptious sugar topping that I'm always tempted to eat off of everyone else's muffins... (I usually make Mopsy's recipe of blueberry muffins, which makes a light, springy muffin with even more blueberries; the next time I make them, I'll post the recipe for a change of taste and texture.)

1/2 cup butter
1 cup sugar
In a large bowl, cut butter into sugar.

2 eggs
Beat until light and fluffy, then fold into butter/sugar mixture.

In a bowl, mix together 2 cups flour, 2 tsp. baking powder, and 1/2 tsp. salt. Add to the butter mixture and stir in 1 tsp. vanilla. Mash 1/2 cup blueberries (fresh or thawed) and add to the dough. Fold in 2 additional cups unmashed blueberries and spoon batter into muffin tins.

Mix together 4 tablespoons sugar with 1 tablespoon vanilla and crumble on the top of muffins. Bake at 375 degrees for about 25-30 minutes.

Makes 12 unhealthy, real-good muffins.

Raspberry Ribbons


These cookies are made primarily with four ingredients that have stood the test of time-- butter, sugar, vanilla, and raspberry-- and they have an uncomplicated and thoroughly delicious taste. They are crisp-edged, soft-crumbed, and melt-in-your-mouth-ish when fresh. After storing in an airtight container, they become simple, soft butter cookies but are still yummy.

1 cup butter, softened
1/2 cup sugar
1 egg
1 tsp. vanilla extract
2 1/4 cups all-purpose flour
1/2 tsp. baking powder
1/4 tsp. salt
1/2 - 3/4 cup wild raspberry jam (or regular raspberry if you don't have access to a jam-making Mopsy Johnson)

Glaze:
1 cup confectioner's sugar
2 tablespoons evaporated milk
1/2 tsp. vanilla extract

In a mixing bowl, cream butter and sugar. Beat in egg and vanilla. Combine the flour, baking powder, and salt; gradually add to creamed mixture and mix well. Divide dough into four porions; shape each into a 10-in. x 2 1/2 in. log. Place 4 inches apart on greased or foil-lined baking sheets.

Make a 1/2 inch depression down center of each log. Bake in 350 degree oven for about 10 mintues (or a bit less). Fill depressions with jam. Bake 10-15 minutes longer or until lightly browned. Cool for 2 minutes and cut into 3/4 inch slices. In a small bowl, combine glaze ingredents until smooth and drizzle over warm cookies. Cool completely (if they last that long). Makes about 5 dozen (but I usually cut them wider, so this recipe makes about 3 dozen.)

Tuesday, November 07, 2006

Homey (Country) White Bread


The last few weeks, I've used this recipe for the Communion loaf, and I think I'm sticking with it. The texture is soft and tender, the flavor is somewhat sweet with a hint of buttery richness (even though it contains no butter), and, very importantly, the crust is soft enough for Elder Jones to break the loaf without popping a blood vessel. I like to eat this bread by the handful.

2 packages (1/4 oz. each) active dry yeast (about 4 and 1/2 teaspoons)
2 cups warm water
1/2 cup sugar
1 tablespoon salt
2 eggs beaten, room temperature
1/4 cup vegetable oil
6 1/2 to 7 cups flour, divided (I use a 50/50 mixture of all-purpose and bread flour)

In a small bowl, dissolve yeast, sugar, and salt in warm water. Let sit to proof (until foamy on top). In a large bowl, combine eggs and oil. Add yeast mixture to this, and stir in about half the flour until smooth. Stir in enough remaining flour to form a soft dough. The dough will be extremely soft and sticky, and you can add extra flour, as needed, but use as little as possible in order to handle it.  (Although I love to knead bread, for this recipe, I use the dough hook on my stand mixer, so that it can be kneaded without adding too much extra flour.)  If you don't have a stand mixer with a dough hook, turn onto a floured surface and knead by hand until smooth and elastic, about 6-8 minutes.

Place in a greased bowl; turn once to grease top. Cover and let rise in a warm place until doubled, about one hour.

 Punch dough down. Divide in half and shape into two loaves (see below). Place in two greased 9x5x3 loaf pans. Cover and let rise until doubled, about one hour. Bake in 375 degree oven for about 20 minutes, or until golden brown and hollow-sounding when thumped on the bottom.  If they don't sound hollow, pop them in for a few more minutes. If they begin to brown too much on the tops before they're done, loosely tent them with aluminum foil.

To shape loaves:
To create evenly-rounded loaves (using a rolling pin on a lightly floured surface), roll each ball of dough into a roughly 12-inch x 8-inch rectangle (you may hear air bubbles pop as you do this). Dust off any loose flour clinging to the dough, and, beginning at the short end, tightly roll up each rectangle. Pinch the seam and the ends to seal. Place seam side down in bread pans.

Thursday, November 02, 2006

Two-Tone Cheesecake


Cheeeeeesecake.

Most of the times I've made this simple cheesecake, it's been exceptional. The other times, it's still been delicious enough to eat a third helping, but I'm easily swayed by cheesecake of nearly any variety, so that doesn't say all that much. I'll post a picture the next time I make it, but, until then, this is a two-layer cheesecake: chocolate crust, chocolate cheesecake layer, plain cheesecake layer, topped with grated semisweet chocolate.

Here is the recipe, as nearly as I recall, as I cobbled it together from a handful of other recipes. It's okay if it's not exact, because cheesecakes are very forgiving creatures.

Crust:
About 3 cups crushed chocolate crumbs (out of thriftiness, I use generic oreos from Aldi, but chocolate graham cracker crumbs might work better, and, if you aren't thrifty, you could add some finely chopped almonds, too.)

If using generic oreos, stir in about 1/3 cup melted butter, enough to help the mixture stick together.
If using chocolate graham cracker crumbs, stir in 1/2 cup sugar and 1/2 cup melted butter.

Press onto the bottom and 1 and 3/4 inch up the sides of a greased 9-inch springform pan. Bake for five minutes in a 350 degree oven and cool completely on a wire rack.

Filling:
3 packages cream cheese, softened
1 cup sugar
3 eggs, lightly beaten
2 tsp. vanilla extract

In a large mixing bowl, beat the cream cheese and sugar until smooth. Add eggs, and beat on low speed just until combined. Beat in vanilla just until blended. Set cheesecake mixture aside. Meanwhile, melt about 1 cup semisweet chocolate chips (or 6 oz. semisweet chocolate) in the microwave, stirring frequently to avoid scorching. Divide the cheesecake filling into two bowls, with one bowl holding about one cup less than the other. Fold the melted chocolate into the smaller amount of filling until fully incorporated.

Spread the chocolate cheesecake filling evenly over the cooled crust. Then, carefully spread the white cheesecake filling over the chocolate layer, spreading gently so that the white layer rests on top of the chocolate instead of sinking into it. Bake in a 350 degree oven for about 45 minutes or until the center is almost set. Cool on a wire rack for ten minutes. Carefully run a knife around the edge of the pan to loosen the crust. Cool for one more hour and then refrigerate overnight to let the flavors ripen. Throw a cup of semisweet chocolate chips in the blender, coffee grinder, or food processor OR grate 6 oz. of semisweet chocolate and sprinkle on top of cheesecake.

Tips:

Place foil or a cookie sheet under the cheesecake because many springform pans leak, and a houseful of burnt butter's smell and sting isn't pleasant.

Dip a knife in warm water before cutting the cheesecake, and wipe and dip again in warm water before making each cut in order to make clean cuts.