Thursday, July 25, 2013

Blast from the Past: Photo Dump

It's been four years since I took these photos with a non-Fancy Camera. I don't have the desire or energy to find the recipes, so use them as visual inspiration, instead!


Dill, Ham, and Zucchini Soup (from Rachel Ray, but not pureed):


Summer Squash Pasta with Tomato, Basil, Garlic, and Some Kind of Mysterious Cheese:


Zucchini Quiche: delicious and cheesy as all get-out but with a weird yellow cast because I took the picture after dark


Re-fried beans: oooh, these were good!  Savory and delicious


Tortillas: Easy enough to find a million recipes for these on the internets.  Take your pick!


Super-Simple and Delicious Fresh Salsa: As I recall, this was simply chopped garden tomatoes, onions, fresh garlic, fresh cilantro, salt, and bright lime juice.


Put 'em all together and whaddya get?  Another day older and deeper in debt?  No!  You get a delicious burrito, folks.


Corn on the cob brushed with Cumin-Lime-Cilantro butter.  This was good, too.


Chicken-topped salad with seared corn and Southwest Dressing:


Butternut Squash Curry:


Spiced Applesauce Muffins (made up the recipe and can't find it anywhere...oops):


Chocolate Chip Muffins (made with homemade yogurt and banana instead of oil).  I wish I hadn't lost my notes for these!


Mini Zucchini Quiches (this one is actually moving into Fancy Camera territory, so I must have made it within the last three years):


Cinnamon-sugar Pull-apart Bread (Joy the Baker's recipe):


Maple-glazed whole wheat scones:


Millie's Mystery Muffins

Four years ago, when she was a new seven-year old, Millie took these pictures of muffins she had just made.  Sigh.


I took the following two pictures four years ago because I thought her "mystery ingredients" were gross and funny.


Instead of jam or chocolate chips or berries, which would have been my go-to ingredients, she added as many autumn sprinkles as she could, an entire bag of stale butterscotch chips, and a bunch of  lemon extract.  Mmmmm.  How mysterious!


Friday, March 08, 2013

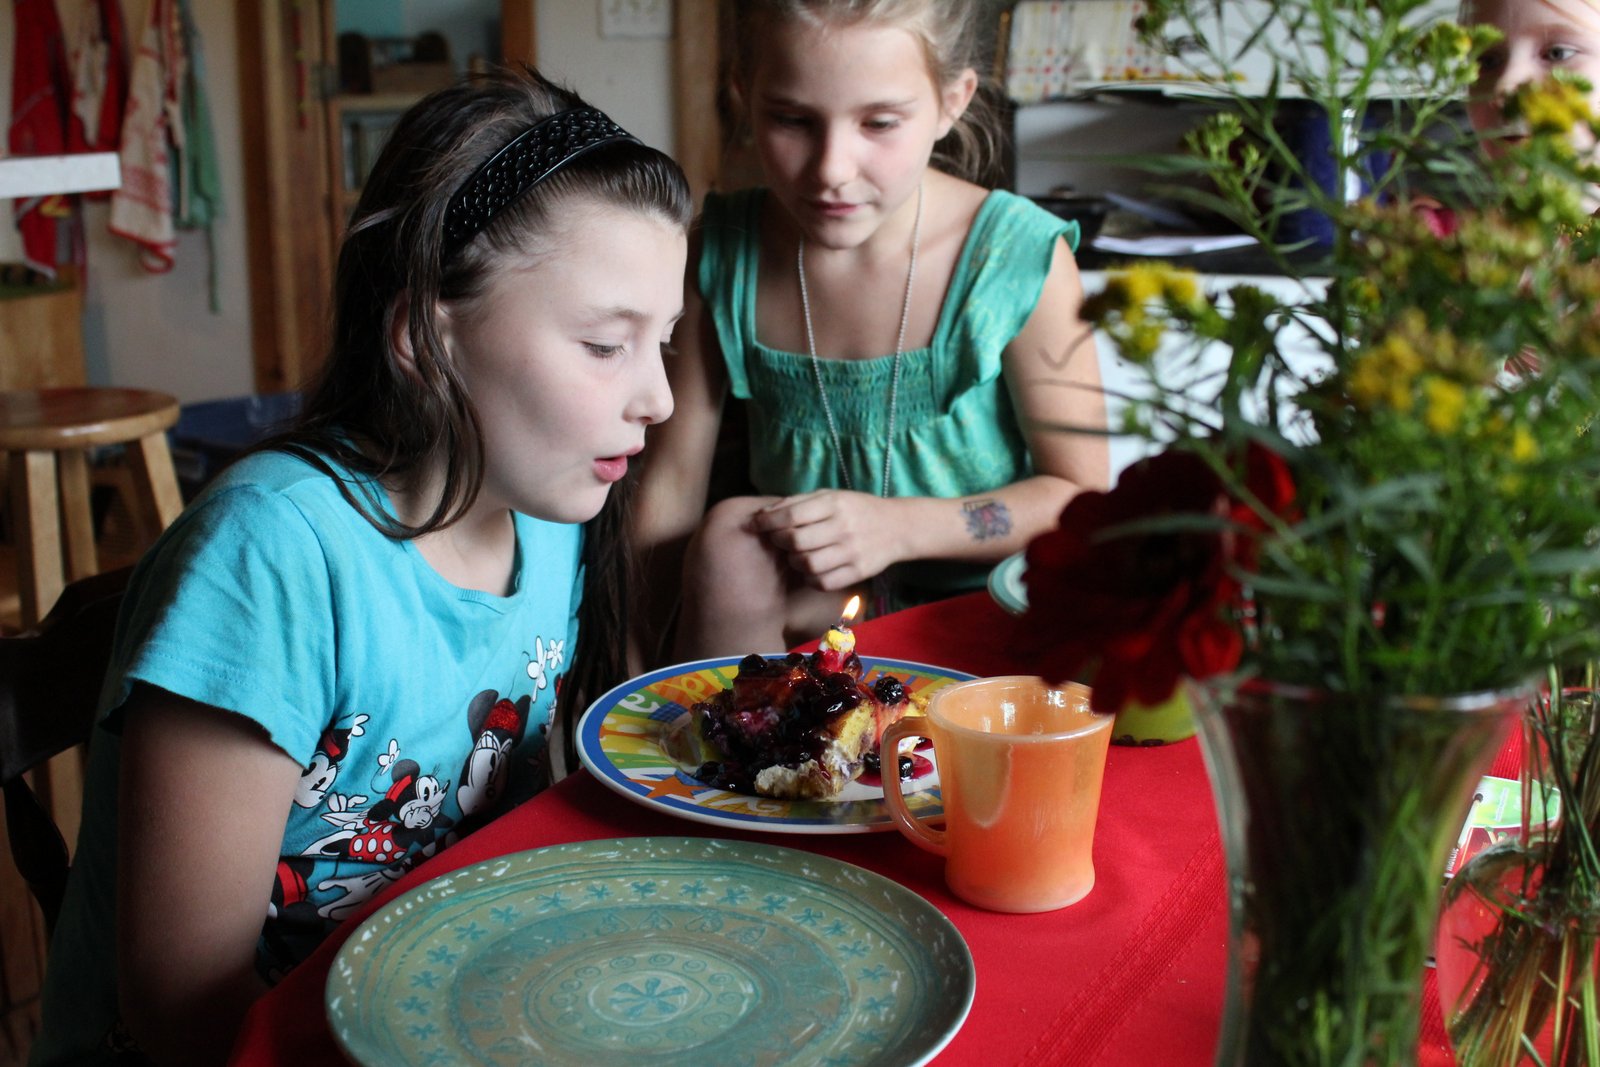
Blueberry Cream French Toast


All apologies for the ugly picture.  I had one of the girls hold a napkin behind this just before we gobbled it for Millie's birthday breakfast.  Don't let it dissuade you from this exceptional breakfast!  Also, unless your free-roaming chickens also provide you with shockingly yellow yolks, the bread won't be tinged this brightly.

I've made this several times for special occasion breakfasts, and the fact that it's assembled the night before makes for smooth sailing the next morning.  (Shhh.  Don't tell anyone, but for Millie's birthday breakfast, I assembled it right before baking and just smushed the bread into the egg batter to soak it thoroughly.  It worked just dandy.)

If my approval isn't enough, and you still need some convincing (or a kick in the pants), this recipe was the Grand Prize winner in Taste of Home's "Very Berry" contest of 1996.  Thanks to you, Patricia Walls of Aurora, Minnesota, we have a winner!

Ingredients:
-12 slices day-old white bread, crusts removed (I use rustic bread and don't remove the crusts because I like the texture, plus I'm lazy.  Also, I'm a rebel)
- 2 packages cream cheese (I often use less.  1 - 1 and 1/2 packages.)
- 1 cup fresh or frozen blueberries (I've only ever used frozen leftover from summer picking.)
-12 eggs
-2 cups milk
-1/3 cup pure maple syrup

Sauce: I usually double this, because the following amounts only make 1 and 3/4 cups, and we like blueberry sauce used liberally.
-1 cup sugar
- 2 tablespoons cornstarch
- 1 cup water
- 1 cup fresh or frozen blueberries (I use frozen.)
- 1 tablespoon butter

Cut (or tear) the bread into one-inch cubes.  Place half in a greased 13 X 9 inch baking dish.  Cut cream cheese into one-inch cubes* and place over bread.  Top with blueberries and remaining bread cubes.  In a large bowl, beat eggs.  Add milk and syrup; mix well.  Pour over bread mixture.  Cover and chill for 8 hours or overnight.

Remove from refrigerator 30 minutes before baking.  Cover; bake4 at 350 degrees for 30 minutes.  Uncover; bake 25-30 minutes longer or until center is set.

For sauce, in a small saucepan, combine sugar, cornstarch, and water until smooth.  Bring to a boil over medium heat; cook and stir for 3 minutes.  Stir in blueberries; reduce heat.  Simmer for 8-10 minutes or until berries have burst.  Stir in butter until melted.  Serve over the French toast.

NOTES:
I don't like the cubes of plain cream cheese in the French toast.  It seems like too  much straight cream cheese (though I don't have a problem eating cream cheese plain, otherwise; go figure).  I usually cut the amount of cream cheese and add some sugar and vanilla extract, mixing until smooth.  Then I drop it by dollops onto the bottom bread layer.

UPDATE: 8/22/20 for Mildred's 18th birthday breakfast.
This is what I do now. It's easier and yummier.

First Layer:
1 and 1/2 loaves unsliced French or Italian bread, torn or cut into 1-inch pieces
18 eggs
3 cups milk
about 4-5 tablespoons butter, melted
generous splash of vanilla

Place the bread in a giant, greased pan (equivalent to 1.5- 2 13x9 pans).
Mix the eggs, milk, melted butter, and vanilla thoroughly and pour over the bread. Smush down/stir slightly to ensure all bread is soaked evenly.

Second Layer:
4 cups frozen blueberries, sprinkled evenly over bread mixture

Third Layer:
1 and 1/2 or 2 blocks cream cheese, softened
2 eggs
about 1/2 cup to 2/3 cup sugar
generous splash vanilla
ground cinnamon

Blend thoroughly and spread evenly over the blueberries.
Sprinkle well with ground cinnamon.

Fourth Layer:
Take remaining 1/2 loaf of bread and cut into one-inch pieces. Mix 6 eggs, 1 cup milk, and a small splash of vanilla together and mix with the bread until bread is moistened. Sprinkle bread cubes evenly over the top.

Put in refrigerator to bake later or bake immediately. If baking later, let it sit on the counter for 1/2 hour before baking. Bake, covered, at 350 degrees for 30 minutes and then uncover and bake an additional 30 minutes or until top is lightly golden and inside is cooked. The casserole should be fully cooked yet not dry.

This is so good and decadent alone that we don't use maple syrup or blueberry sauce on it.

Chocolate Covered Cherry Candies

Two years ago, I made these for a dear woman at my church.  She loves chocolate covered cherries, and I love her, so I figured it was worth a shot.  Because they entail wrapping homemade fondant around a damp cherry, they're not as easy* as, say, peppermint patties, but oh, are they goooood.  Someone Else may also love chocolate covered cherries, but I'm not saying who.  Someone Else may have nibbled 6 or so for quality control.  Again, I'm not saying who.  (Chocolate stains? By my mouth?  Naw.)

These rich candies are awfully good, but I didn't let the ones that Someone Else ate ripen for the full 2 weeks before Someone Else gobbled them, so I can only tell you that if you eat them the next day or any of the 2 days following their making, the fondant will still be thick and gooey instead of fully liquid.  Obviously, that didn't keep me Someone Else from eating a half dozen of them.

I doubled the recipe, so halve what lies below for a single batch.

Fondant:
-4 and 1/2 to 5 cups powdered sugar
- 1/2 cup butter
-1/2 cup sweetened condensed milk
- 1 teaspoon vanilla extract
- 1/2 teaspoon almond extract
- 1 tablespoon reserved maraschino cherry juice
- a pinch of salt

Cherries:
2 jars of maraschino cherries, drained, reserving 1 tbsp. of juice (I didn't use the full two jars, perhaps because I ended up coating them fairly thickly with the fondant.)

Coating:
-24-36 semisweet chocolate chips (depending on how thickly you coat the candies)
- 1 tbsp. butter or shortening

1. Cream butter, add a few cups of powdered sugar and mix until smooth, add sweetened condensed milk, extracts, and salt, and then add remaining powdered sugar gradually until combined. Mix until smooth and then put in the refrigerator until firm.

2. Freeze the cherries in a single layer on a wax-paper lined cookie sheet for one hour.  (Drain the cherries as thoroughly as possible first.)

3.  Scoop 1-2 tsp. fondant, flatten in your palms, and wrap around each cherry, enclosing each completely.  Freeze these covered cherries on wax-paper lined cookie sheet for an additional hour (or longer) until easy to handle.

4.  In a double boiler or bowl set over a pot of simmering water, combine the chocolate chips and butter/shortening, stirring until smooth and melted.  Dip the cherries one at a time in the chocolate, coating completely, and then place on wax-paper lined sheets to harden. 

5.  Eat immediately for soft fondant in the middle; let ripen for 1 -2 weeks for liquid centers. 

*If you've never coated candies in chocolate before, I'd recommend practicing on a candy that's simple to dip first, such as the peppermint patties.  That way, you'll get the hang of it and have peppermint patties to eat, to boot.

The Most Heavenly Vegetarian Sandwich for Meat Lovers: A Non-recipe

Two summers ago, John ate lunch with a work fellow, and he had a memorable vegetarian sandwich. Since he saved a few bites for me (lovely man), I also had a memorable vegetarian sandwich. Now, let it be known that I love meat even though we don't eat it regularly, but this sandwich was tops. Tops! That same summer, I attempted to recreate it with vegetables from our garden, and, not to toot my own horn, I made a pretty mean sandwich. By "pretty mean," I mean "pretty darn near perfect."

(Toot.)


To begin, here's an ingredient list:
Oh, wait.  It was TWO SUMMERS AGO.  I don't remember the exact amounts, so you're on your own here.  Do you like how I absolve myself of any liability if your sandwich doesn't turn out pretty darn near perfect?

-two red peppers, roasted, with seeds, ribs, and skin removed, then cut into strips
-one average-sized eggplant, sliced into 1/4- 1/3-inch slices (next time I'll also peel the thing)
-one enormous onion, sliced into thin rings (I used yellow, but I wish I'd grown a gourmet red)
-fresh garlic, many cloves, minced
-fresh basil, cut chiffonade
-balsamic vinegar
-salt
-pepper
-a bit of sugar
-extra virgin olive oil
-free WILD MUSHROOMS! (...or any kind of mushroom, or mushrooms you have to pay for, or omit the mushrooms entirely. You decide.)
-crusty, dense bread given to you by your mother (It could be either purchased or baked bread, I suppose, but I can't guarantee the results if it's not bread given to you by your mother.)


First, roast your peppers. Google instructions if you've not done it before. I'm too slothful to show you anything but the final product.


Toss eggplant slices in a bowl with balsamic vinegar, basil, minced garlic,


Stir in the roasted red peppers.


Go into the woods and search for wild mushrooms OR grab your free jar!  (Or buy one, but, again, I can't guarantee the results.)  Dump as many drained mushrooms as you like into the bowl and stir together to coat.  Season it all with salt, pepper, and sugar, to taste, and then spread in a single layer on a rimmed baking sheet.  Bake in a hot oven (400 degrees?) until eggplant is soft and the rest is hot and steaming.


While the eggplant is baking, take your sliced onion, throw it in a frying pan with a couple of teaspoons of extra virgin olive oil, and cook until onions are caramelized, adding salt and stirring as needed.

When onions are finished, toss with the eggplant mixture in a big bowl, lightly toast your crusty bread, and top with a hearty mountain of the eggplant mixture.


Top with a second slice of bread if you want, and then act like Dagwood.
Watch out.  It may be messy.


Thursday, March 07, 2013

Kale, Sweet Potato, and Caramelized Onion Pizza

Buildabelly doesn't accurate reflect my family's diet, but, hoo boy, I wish it did!  We'd eat lots o' meat (MEAT!), cheesecake, butter, butter, butter....more butter. Did I mention sugar? Sugar, sugar, sugar.  Sadly, our diets are more lackluster and barren. (What?  Our diet is cheaper and healthier?  Who cares!)  We do have pizza on most Friday nights, which, in summer, we top with all manner of garden vegetables, but in winter, it's cheese pizza every blessed week.  Once in a while I toss on roasted broccoli or caramelized peppers and onions, if we find a good sale, and there's the occasional white spinach pizza for good measure.  Yummy.  Boring.

 Enter kale and sweet potato pizza, a riff on this recipe.
Before you proceed, let it be known that while John and I loved it, the girls would have preferred yummy, boring cheese pizza, but what do they know?


Ingredients:

-Your favorite pizza dough recipe (I used 50/50 mixture of white and whole wheat flour)

Topping:
-2 sweet potatoes, sliced thinly (I use a mandoline slicer) tossed with 2-3 tsp. olive oil and a hearty sprinkling of sea salt.  Spread in a single layer on cookie sheet and oven-bake at about 400 degrees 'til centers are soft and edges are lightly golden crisp (in my oven, this only takes 10 minutes or so for thin slices)
-2 onions, sliced into thin rings and caramelized with  2-3 tsp. olive oil 'til sweet and golden brown.  Add salt and pepper, to taste.
-6-7 cloves fresh garlic, minced, and added to onions for last several minutes of cooking until soft
-several generous handfuls kale, torn and ribs removed, tossed with 1 tsp. olive oil, 1 tbsp. or so balsamic vinegar, and a hearty pinch of sea salt
-shredded mozzarella

Onto your unbaked pizza crust, spread the caramelized onions, spread the kale, layer the sliced sweet potato slices, and top with shredded mozzarella cheese before baking as you usually do.  (High heat oven, baking stone, cookie sheet...you pick!)


I had intended to add some ground rosemary to this, also, but I plumb forgot.  Next time I will, because (sorry, girls) I will be making this again!


Blast-from-the-past Pizza Pods a la Buffalo, NY: A Non-recipe


While John was getting his master's degree in Buffalo, we'd go to the Pizza Plant when his family visited, and I would eat the most delicious pizza spin-off ever created-- The Chicken Souvlaki Pizza Pod. I love pizza.  I love chicken souvlaki even more than pizza, so this was a match made in heaven.  The pizza pods at the Pizza Plant (say that 20 times as fast as you can) were essentially creatively-stuffed calzones in a trademark pod shape but executed in such a brilliant way as to become something new-- PIZZA PODS.

Anyway, to bring us back to earth with an abrupt crash, I've never made a chicken souvlaki pizza pod.  Here's a non-recipe for the spinach pods I occasionally make.


Ingredients:
-Pizza dough recipe, your choice
- A bag of frozen, chopped spinach, drained well
- Lots of fresh garlic cloves, minced and cooked in a bit of olive oil over medium heat until softened slightly. (When I say lots, I mean LOTS. We like garlic around these parts.)
- Grated Parmesan cheese
- Salt and pepper in liberal amounts
-Your favorite homemade or storebought Italian vinaigrette
- Lots of mozzerella cheese, shredded (If you've got feta, go for it!  Do it!  Do it now!)
-I've only done this once, but to make to-die-for spinach pods, grill up some of these and add them to the mix.  

In a large bowl, toss the well-drained spinach with the garlic and parmesan.  Drizzle many glugs of the Italian vinaigrette, to taste, and then add s + p, to taste.  Stir in the shredded mozzerella and/or feta, in the amount you desire.

Divide the prepared dough into fist-sized balls (or larger, depending on how large a pod you want to eat).  On a lightly flour-dusted surface, roll out very thin in an oblong shape and heap a mound of filling down the center, leaving at least a one-inch margin around the edges. Roll up, pinching the dough together as you go.  When it's sealed, carefully move to cornmeal-dusted baking stone or sheet*, seal-side up, and bake at a high heat until dough is done.  (If you've made pizza before, just do whatever you do to normally bake your pizza.)
*If you're using a cookie sheet instead of a preheated stone, you can roll the dough out right onto the cornmeal and save yourself the trouble of moving it.

Also, here's proof that a few times a year, we even buy pepperoni.
Yum.
Long live the pig!


(I rolled this one out too thickly.  Oops.)
 

Tuesday, March 05, 2013

Some Form of Squash Soup

 
It's pretty, isn't it?  What a shame that I have no idea what I put in it.  The scrap of paper is long gone, and I'm three years too late...

Blast-from-the-Past Apple Bars


I took these pictures over three years ago with my non-fancy camera, and now they've surfaced to nobly serve the people.  Apple desserts are always noble, but this one is especially so.


I've been gobbling these since childhood, and they're actually called "Apple Pizza," but the name is misleading, and I feared readers might gloss over a recipe that deserves their closest attention and is a 100% Absolute Keeper. Hence, I changed its rightful name to a dull (but safe) "Apple Bars."  When John and I were first married, I naively would make entire batches of this, and we'd spend a week eating nothing but apple pizza.  We still both love it, which I think says something for its yummy, noble nature.

My in-laws prefer this to apple pie, and it's easier to make than apple pie.  Win-win!  It has a buttery bottom layer that's a marriage of shortbread and pie crust, a soft, apple-packed center layer, and a thick, sugar-crumb topping.  Every person to whom I've served this has professed love, the reason for which will be perfectly clear when you see how much butter it contains. 
 

Classic Apple Pizza or (if you're cautious) Apple Bars

Crust:
- 2 and 2/3 cup flour
- 1 tsp. salt
- 1 cup butter
- about 6 tablespoons cold water*
*If you're crazy, you can slightly decrease the water and slightly increase the butter.

Filling:
- about 8 large apples, peeled and sliced
- 1 tsp. cinnamon (I always dump in lots more; nutmeg and/or orange peel are optional, and I don't usually add them)

Topping*:
- 1/2 cup butter
- 2 cups granulated sugar
- 1 and 1/2 cups flour
*I one-and-a-half times this, 'cause the topping is so stinking good.  (so 3/4 c. butter, 3 c. sugar, and so on)

1. For crust, cut butter into flour and salt.  Mix in water with a fork just until moistened and pat evenly onto ungreased jelly roll pan or large, rimmed cookie sheet.

2.  Mix sliced apples with cinnamon and layer in a single layer over the crust.

3.  For topping, cut butter into sugar/flour mixture and sprinkle evenly over the entire sheet.

4. Bake at 375 degrees until apples are soft and crumb topping is golden brown.

5.  Eat five all in a row!

Spicy Ethiopian Chicken


I don't remember why I called this dish Ethiopian.  I remember thinking it was funny for some reason, but that reason has disappeared in the year and a half since I made it.  Perhaps because of the cardamom?  Perhaps the ginger, the allspice?  Perhaps because I thought it elevated the recipe to new, hoity-toity heights?  Who knows. I do remember that it was savory and delicious enough for me to sip leftover broth from a spoon, and that's always a good sign, right?

Here's a hoity-toity Ethiopian dish.  Make it, gobble it, and feel like a globe-trotting, culinary superstar! Oh, and here's another small and funny thing.  When I'm cooking or baking something off the cuff (which happens nearly daily), and I think it might turn out to be a keeper, I quickly jot down approximations of what I dumped into the dish/muffins/cheesecake, and then I stuff that scrap of paper into my recipe box of doom.  As near as I can tell, I just found the right garbled scrap of paper for this snapshot, but it's not labeled, so....

Oh, bother.  Throw caution to the wind!  Live with your eyes wide shut!  Ride the winds of danger!  Make this for supper tonight!


Abigail-Has-Never-Before-Flown-in-a-Plane Globetrotting Superstar Cajun-Ethiopian Chicken with Rice   (I realize the title could use some work.)

For the rice:
-3 cups dry rice, cooked in the manner of your choosing

For the rest:
-chicken broth (or water/bouillon)
-1 large white onion
-1 tablespoon freshly minced ginger
- about six cloves fresh garlic, minced
-1 and 1/2 tablespoons, or thereabouts, homemade Cajun seasoning (The recipe I use can be found here; just scroll to the bottom.  Thanks again, Emeril!)
-3/4 teaspoon ground cardamom
- 1/2 teaspoon ground allspice
- 1 can diced tomatoes with juice
- 3 chicken breasts, cubed in large chunks

Aaand that's all I have jotted down on the scrap of paper!  Brilliant, isn't it?

However, here's what I suggest you do with the above ingredients.

1. Dice the onion and saute it in a few teaspoons of extra virgin olive oil until softened and slightly translucent.  Add the minced ginger and garlic and cook over medium-low heat for a few minutes until the garlic softens and flavors are blended.

2. Dump in several cups of chicken broth, diced tomatoes and juice, spices, and the chicken pieces and simmer, covered, until the chicken is juicy and cooked through.  Add additional water, as needed, to keep the fluid levels constant.

3.  Serve piping hot beside the rice.

4.  Sip the leftover savory juices from a spoon.

5. Hop on a plane, fly to an exotic place, and think of me in Nanticoke.

Cumin-Spiked Barbeque Sauce


This was the most unusual and delicious barbeque sauce I'd ever made and had a perfect balance of flavors. I stole the recipe from somewhere, took a picture, and promptly lost the recipe.  Sigh. 

R.I.P, awesome barbeque sauce.

Friday, August 19, 2011

Blast from the Past: Cherry Almond Jam


I've decided to label all posts with pictures taken Pre-Fancy Camera so that everyone will know they're consuming an outdated recipe. That said, this jam doesn't even taste stale! Plus, it's joined wild raspberry jam and wild strawberry jam as my favorite.


4 cups pitted, crushed-- not pureed-- sour cherries (should measure 4 cups after crushing)
1/2 tsp. butter
1 tbsp. lemon juice
5 and 1/2 cups granulated sugar
1- 1 and 1/2 tbsp. almond extract

4/5 cup pectin (or slightly more than whatever your pectin directions instruct for one batch of sour cherry jam because this jam can be runny if a bit more isn't added)

I assume that if you're making this, you've made jam before, so I won't go into great detail. (It's super easy, anyway, so if you've never made it, go for it!) Combine cherries, pectin*, butter, and lemon juice in large sauce pot. Bring to a rolling boil over high heat, stirring constantly. Add sugar. Bring to a rolling boil a second time. Boil hard for one minute, stirring constantly. Remove from heat. Skim foam if necessary. Stir in almond extract, to taste. Pour hot into hot jars, leaving 1/4 head space. Adjust caps. Process for 10 minutes in a boiling water bath or turn upside down for about a minute to seal before inverting. *Prepare jam per your pectin instructions (i.e. follow correct sequence for liquid or powdered pectin).


Spread over muffins in the middle of winter and wonder at the beauty of eating rubies.


Spicy (or Not-so-spicy) Summer Stirfry a.k.a. You Should Make This Tonight!


I think we just ate my favorite stirfry yet, probably because it's a garden-harvest-vegetarian riff on Martha's beef bulgogi recipe from five years ago, and with the addition of sesame oil. (I'm sorry for the weird color cast; I took this picture at dusk because I was too busy eating beforehand.)

This is a sweet-spicy-sesame-y stirfry that tastes...um...simply smashing! So lame, I know. Sometimes I have alliteration spasms. It's a disorder. (ASD.)

Cook up some brown rice. During the forty minutes you wait for it to cook, gather

a few tablespoons olive oil
one onion, chopped
about 4 carrots, thinly julienned

1 small-medium zucchini, thinly julienned
1 small-medium yellow summer squash, thinly julienned*
about 5 cups sugar snap peas (the eat-the-pod-and-all kind), strings removed
2 tbsp. freshly minced garlic (about 12 cloves)
1 and 1/2 tbsp. finely chopped or grated ginger
3/4 cup soy sauce
1 tbsp sesame oil (or more, if you like a really heavy sesame flavor)
6 tbsp. brown sugar (a bit more or less, to taste)

1 tbsp. cornstarch dissolved in a few tablespoons of cold water
ground cayenne or red pepper flakes or fresh hot peppers (ribbed, seeded, and chopped), to taste

In a few tablespoons of olive oil, saute the onions and carrots until the onion is translucent and carrots are nearly crisp-tender (if using fresh hot peppers, add then in, also). After mixing the soy sauce, sesame oil, and brown sugar in a small bowl until sugar dissolves, add the next eight ingredients with 1/3- 1/2 cup water to the pan and cook over medium heat until vegetables are crisp tender. Stir in the cornstarch/water mixture and cook until sauce thickens. Add cayenne or red pepper flakes to taste.

We loved this, especially the sweet crunch of the sugar snap peas.

*A mandoline slicer really does beat all. John picked mine up for ten bucks several years back, and I've been using it to slice and julienne like one obsessed, which is probably because I am obsessed. Mine looks similar to this, except that it didn't cost forty dollars. If you find one for a reasonable price, grab it! They are just about as handy as hands.

Gooey Hot Fudge Sauce


I don't remember from where I copied this, but I'm willing to bet it was a Martha Stewart cookbook from the library when Millie was a baby, and I'm not just saying that so you'll trust me when I say it's divine.

It's divine! (Even Martha thinks so.)

1 cup heavy cream
1/2 cup light corn syrup
12 oz. semisweet chocolate chips

Combine cream and syrup in a pan. Stir to combine and bring to a boil over medium-high heat. Remove from the heat and stir in the chocolate until incorporated and smooth.

Spoon warm (but not hot) over ice cream, cake, or straight into your empty mouth. The unused sauce can be stored in the fridge and will harden enough to be eaten in large, chewy spoonfuls. (Even Martha does this!)

Here's An Idea

Surprise your children by baking a tablespoon of cherry almond jam into their morning muffins!

(I suppose another kind of jam would work equally well.)

Tuesday, August 16, 2011

Oven-baked Zucchini Fries (Are Not Really Fries)


I don't care how many people call them such, zucchini fries are not fries. They are, however, very tasty zucchini sticks. Actually, they're not sticks, either.

Solid straws?
Skinny planks?
Thin logs?
Thickly julienned portions?

I've never deep-fried these before, but given my admiration of fried foods, I can't imagine it would hurt. Does frying ever hurt anything?

Anyway, here is your recipe* for oven-baked zucchini, skinny-sliced-planky-strawed-fries. NO! NOT fries. Whatever. Just eat them! (They are really, truly delicious.) They are, in fact, quite similar to my non-recipe for breaded zucchini slices, only better.
*Here's a confession. I can't find the scrap of paper I jotted the ingredient amounts on as I tossed them in, so the ingredients aren't accurate, but I think they're pretty close. If I find the paper, I'll edit this, but, for now, just use your judgment. It's not rocket science, after all.


If you want enough zucchini for your entire family to eat for lunch (paired with nothing else but dipping sauce), as well as a few handfuls for your mother and sister, as well as a plateful to stick in the fridge, then take

2 medium-large (okay, leaning on the "large" but not yet "baseball bat") zucchini and cut them into "fries."

They can be as thick or thin as you like. I cut more thick than thin because I was in a hurry, but thinner sticks will be crunchier in the end. In a large bowl, mix about 1 cup all-purpose flour with some salt and pepper.

In a medium bowl, mix about 4 eggs and a few tablespoons of milk.

In a large bowl dump
about 4 cups of bread crumbs (I make my own from stale Italian bread, which of course makes plain bread crumbs. If you use seasoned crumbs, decrease spices to suit your tastes.)
about 1/2 cup parmesan cheese
1 and 1/2 tsp. garlic powder
1 tsp. onion powder
1 tsp. salt
1/2 tsp. black pepper
a dash of ground cayenne
a bit of ground paprika
any additional spices you desire
(ground rosemary, Italian seasoning, basil, thyme, etc.).

Preheat the oven to 400 degrees and drizzle a rimmed baking sheet (or two or three) with extra virgin olive oil.

First, dump the zucchini sticks into the bowl with the flour mixture and stir until the sticks are coated. Second, dip the zucchini sticks into the egg mixture. Third, dredge the sticks in the bread crumb mixture until well-coated. Fourth, place them in a single layer on your oiled baking sheet and bake at 400 degrees until browned on the bottom. Flip them and cook for a few additional minutes until browned on all sides and crisp-tender. The total time will depend on how thinly or thickly you slice the zucchini.

While making these, I thought that they'd probably also be yummy flavored with lemon pepper and dill weed paired with a garlic-y tzatziki sauce for dipping. Yum. And then I thought I could dip them in a butter/honey mustard mixture before dredging them in bread crumbs and serving them with more honey mustard, of course. Double yum. I guess I think too much about food when I'm cooking food.

Oh, yes. I made a quick red sauce for dipping by pureeing one quart jar of home-canned tomatoes with one small can tomato paste, salt and sugar in nearly equal amounts to taste, and then rosemary, basil, oregano, parsley, and thyme, to taste.

Enjoy!

And because food pictures just wouldn't be the same without the Hand of Mystery, here's Luci.