Monday, March 24, 2014

The Easiest Cheese Ever, Or, Farmer's Cheese (Or Paneer)


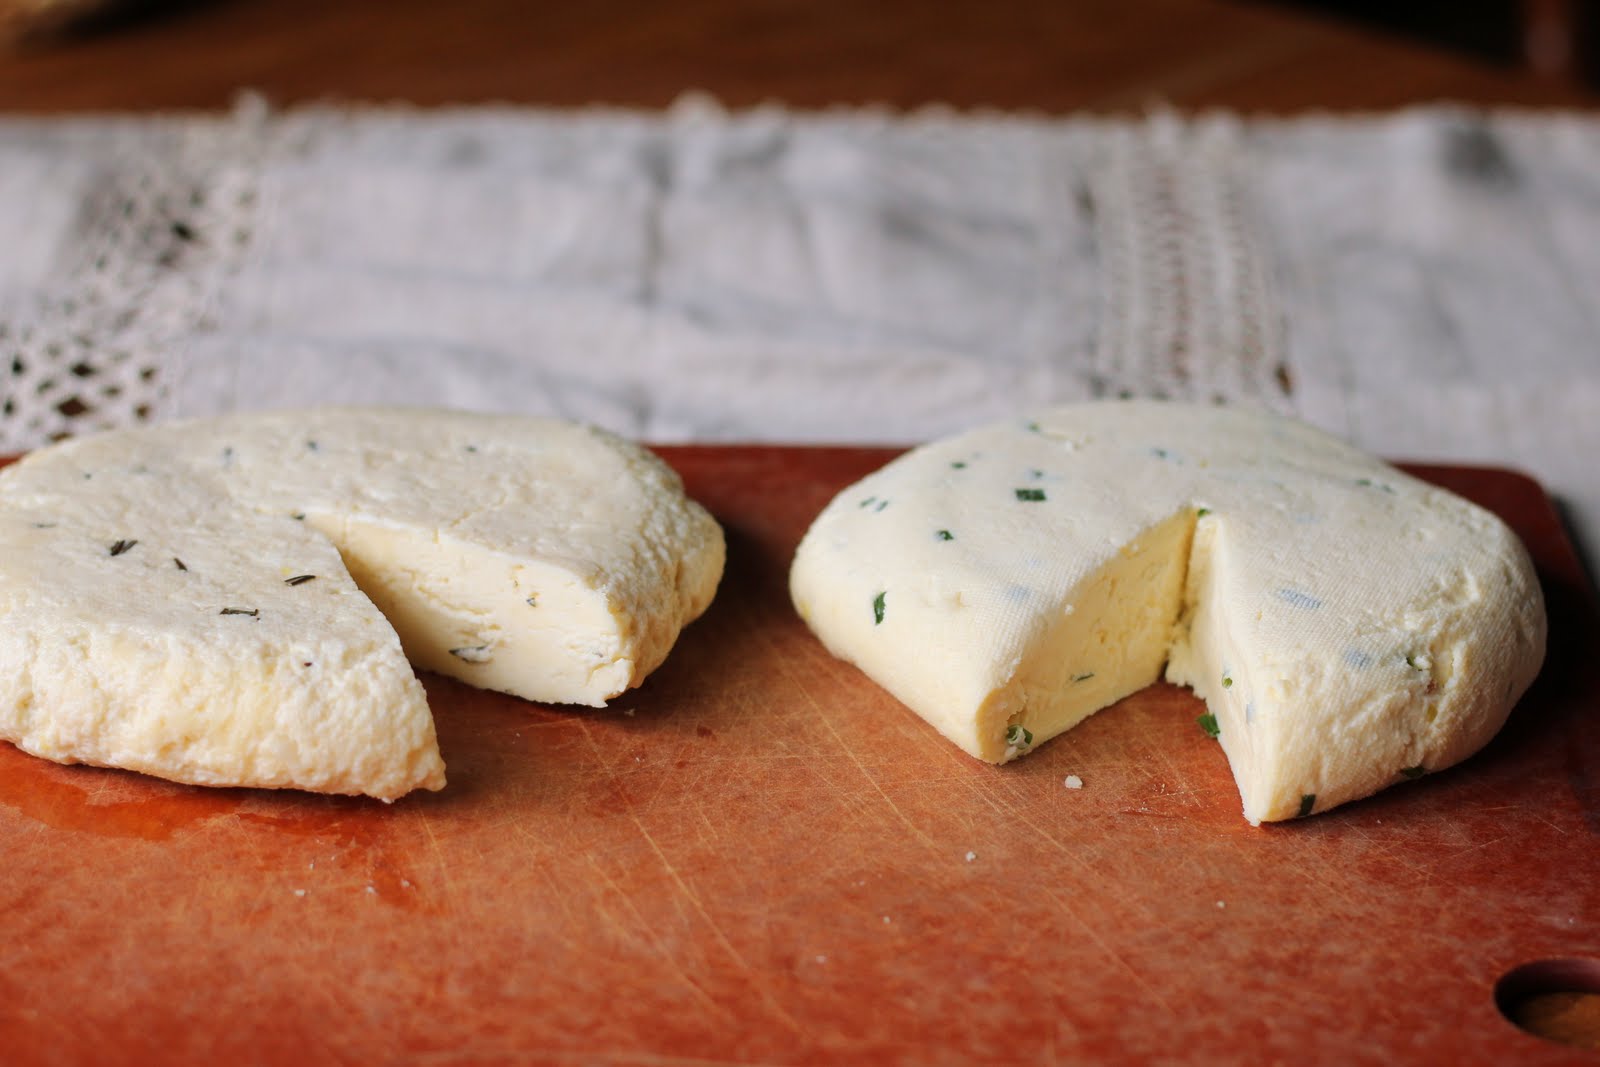
Seasoned or plain, this cheese is hard to beat for ease of preparation and delicious flavor.


I don't exaggerate when I say this cheese takes under ten minutes to make. Then you just let the whey drain, and you're set!  Because it takes too much dinero to buy raw milk, we just buy regular store milk.  As long as it's not ultra-pasteurized, it turns out fine.

$2.05 for one gallon of regular, pasteurized milk + ten minutes = one pound of cheese and a giant bowl of whey to use for baking, to add to shakes, soups, or sauces, or for feeding your chickens.
Not too shabby, huh?

Here's what you need:

-one gallon whole milk
-1/2 cup white vinegar (to make traditional paneer for Indian cuisine, substitute lemon juice for the vinegar)
-salt and/or seasonings
-a large, heavy-bottomed pot
-a colander
-a double layer of cheesecloth

Not necessary but fun to have
-a cheese press, the Real Deal or a makeshift one (to see my makeshift press, see below)
-helper elves to squeeze out whey faster (ditto)

Pour milk into pot and bring milk to a gentle boil over medium heat, stirring frequently.  Turn off heat and add the vinegar (or lemon juice) to pot while stirring constantly.  Within a short time, you should see the curds begin to solidify near the top of the pot, leaving the greenish-yellowish whey behind.  Once they've all separated, remove pot from the burner and carefully pour into a colander lined with your double layer of cheesecloth and resting over a large bowl to catch the whey.   At this point, you can add salt or seasonings, as desired-- for farmer's cheese, we add one tablespoon salt--, mixing them gently into the hot curds.  Note!  If you don't want your large bowl of whey to become flavored with seasonings or salt, then transfer the cheesecloth to another bowl before adding seasonings and squeezing out the rest of the whey.

Once your seasonings are mixed in, lift the cheesecloth and twist it around the ball of cheese, squeezing to remove excess whey.  Then tie it on something high (a kitchen beam, a wooden spoon you slide into your upper cupboard's handles, the sink faucet, etc.) to drain out additional whey for about five minutes.  If you stop here, you'll end with a delicious, mild, crumbly cheese for salads, munching, curries, etc.


For a firmer, slicing cheese, squeeze out the whey as shown and then take the cheesecloth filled with still hot curds and place in a cheese press.  Don't have a cheese press?  No problem.  Just place it on a plate with the excess cheesecloth on the side to ensure a smooth top to your cheese.  Place a second plate on top of the cheese and weigh down the top plate with enough Heavy Stuff to press out the last of the whey and compress the cheese curds into a solid disc.  Refrigerate until firm and then gobble whenever you feel the urge.

Notes: If you make paneer using the lemon juice, you can gently rinse the curds with water after you drain them into the colander in order to remove some of the lemon flavor, if you want to take the extra step.

My current cheese press was given to me by Mrs. Terry and is showcased below.  A large coffee can with nail holes punched along the bottom edge works well.  Place the cheese inside, top it with a small saucer, and weigh down the saucer with Heavy Stuff.  Voila!  Slicing cheese!


Cream Puffs

...because buildabelly needs them.  Because YOU need them.


 I haven't made cream puffs since I was fourteen years old.  After each break, when my parents drove my older sister back to college, I'd make something elaborate from the cookbook to sustain my older and younger siblings and myself while they were gone.  The offerings were predictable: divinity (always a sickly-sweet winner), molasses taffy, cookies and cakes of all kinds, and...cream puffs.  The funny thing is that I only made the puffs and not the cream.  We were so hungry by the time the puffs emerged golden-brown from the oven that we just filled the shells with Christmas m&ms from the basement freezer.

These genuine cream puffs, folks, are even better.


You can thank Millie for them.  I'm not fasting from meals for Lent, but the girls and I have omitted desserts and sweeteners during the week, waiting until Sundays (which aren't part of the 40 days) to add honey to our tea.  Millie's been making one fancy dessert each Sunday, too, and this one hit the spot.  I helped her in parts, but she's the one to thank for the bulk of it.

For the cream puffs, we slightly adapted the classic Fannie Farmer recipe, which follows.

Cream Puffs
(makes 28-30)

1 cup water
8 tbsp. butter
1 cup flour
4 eggs, room temperature
1 tsp. vanilla*

Preheat oven to 375 degrees.  Combine the water and butter in a saucepan and bring to a boil.  Remove from the heat and add the flour all at once, stirring vigorously with a wooden spoon.  Return to moderate heat and stir constantly until the dough leaves the sides of the pan and forms a ball. Remove from the heat and let cool for about 5 minutes.  Add the eggs, one at a time, beating hard until the dough is smooth.  Place large, rounded tablespoons of dough on an ungreased cookie sheet, 2 inches apart.  Bake for 30 minutes or until puffs are golden brown.  Prick the tops with a toothpick or skewer to let steam escape for a few minutes and, after cooling them for a bit on a rack, cut them in half.

Note: She added the vanilla to the dough, and we baked them on parchment paper-lined baking sheets instead of bare sheets.

Cream Filling (Crème Pâtissière)
Makes enough for 28-30 cream puffs.

Millie used Fannie Farmer's Basic Cream Filling recipe, and then she folded sweetened, fresh whipped cream into the chilled filling to make a lighter, fluffier filling.

2 cups milk
1 cup sugar
6 tbsp. flour
1/4 tsp. salt
4 egg yolks, slightly beaten
4 tsp. vanilla

Heat the milk in a heavy-bottomed pan until very hot but not boiling.  Mix the sugar, flour, and salt together in a bowl, stir in the hot milk, and beat until well blended.  Pour back into the pan and continue to stir vigorously over low heat for 4-5 minutes, until very thick and smooth.  Add the egg yolks and cook for a few more minutes.  Cool, stirring from time to time, then add the vanilla.

Cool completely in the refrigerator (or, if you're strapped for time like Millie was, in the freezer) before folding in freshly whipped cream.  Whip 3/4 pint of heavy cream (reserving the remaining 1/4 pint) until soft peaks form and gradually add sugar, to taste, until stiff peaks form.  Fold the whipped cream into the chilled crème pâtissière, and then place a hearty dollop of the filling onto each cooled cream puff before replacing the tops.

Chocolate Ganache Topping

Take the remaining 1/4 pint of heavy cream and heat it together with a cup or so of semisweet chocolate chips.  (We use the microwave for this.  Just heat it for 30 seconds and then in increments of 10 seconds to avoid scorching it.)  Stir together until melted and smooth.  Allow it to cool and thicken a bit until it's the right consistency for topping your cream puffs.  Melt in a few more chocolate chips if it seems too thin. Allow topping to cool and then dig in.

Note: They are best eaten fresh, as they tend to become soggy when stored in the refrigerator.

These are unbelievable, but don't give yourself a bellyache. 
(And if you do, don't say I didn't warn you.)

Baked Pumpkin Spice French Toast


Since we omit sweet scones, muffins, and pancakes during Lent, also, I've made sweet breakfasts the last couple of Sunday mornings. Usually, on Sundays, we're scrambling around like mad and eat oatmeal or something equally fast and easy, so this thrills the girls.  This breakfast is perfect because it's assembled the night before.  In the morning, you can pop it in the oven for about 45 minutes for an easy breakfast.

I winged this, because baked French toast dishes, like savory stratas, are hard to ruin as long as you add enough eggs and liquid to soak the bread.  Here's the recipe, to the best of my memory.  Don't fret.  Remember, baked French toast is hard to ruin!

Also, I used a high ratio of pureed pumpkin to milk simply because I have so much in my freezer to use up, but if you're using canned pumpkin, you can substitute milk (or heavy cream, if you're so lucky!) for some of the pumpkin if you need to.

Baked Pumpkin Spice French Toast

-About 1 and 1/4 loaf rustic Vienna bread, cut or torn into one inch cubes (you can use French or Italian bread, too.  Just tear enough to fill a 13X9 baking dish.)
- 1 and 1/2 cups milk
- 3 to 4 cups pureed pumpkin
- 6 large eggs, slightly beaten
- 2/3 cup granulated sugar
- 1-2 tbsp. vanilla extract.  (My homemade stuff is in a quart jar, and I just dumped in a large glug.)
- 2-3 tsp. ground cinnamon
- 1/4 tsp. ground cloves
- 1/2 tsp. ground nutmeg
- a pinch of ground ginger

Crumble Topping:
1/2 cup flour
1/2 cup packed brown sugar
2 tsp. cinnamon
1/4 tsp. nutmeg
pinch of cloves
1 stick cold butter (8 tbsp.)

For the French toast, arrange the bread cubes in a greased 13 x 9 baking dish.  Combine the remaining ingredients and mix until smooth, then pour over the bread cubes, making sure they're all saturated.  Cover and place in refrigerator overnight.  Meanwhile, assemble the crumble topping by mixing together the dry ingredients and then cutting in the cold butter until the mixture is formed in crumbles about the size of small peas.  In the morning, preheat the oven to 350 degrees, top the French toast with the crumble topping, and bake for about 45 minutes or until a knife inserted in the center comes out clean.