Showing posts with label Main Dish. Show all posts

Thursday, February 25, 2021

Mount Hunger Kung Pao (Mount Kunger Pao?)


Mildred (my little Kung Pao Kutie Pie) just looked over my shoulder and groaned. "It is not Mount Kunger Pao!"

Well, if it's not that, it is, at the very least, Americanized Kung Pao, given the fact that it has peanut butter in it instead of just peanuts and that we here on Mount Hunger add additional sugar, to taste. These are both very American things to do-- take a perfectly good dish, add peanut butter and sugar, and call it good. It's also taken most exotic ingredients away, leaving behind the spicy-sweet flavor combination.

Lest you be put off by this introduction, let me assure you that it is good! I'm posting this recipe in response to a couple of requests for it, so let that give you the confidence to someday try it yourself.

It's a rare dish around these parts, reserved for times when we're craving it. Guess who's craving it right now?

(Mount) Kung(er) Pao

We very loosely follow this recipe, but here's our country bumpkin version. We usually double the amounts and sometimes also increase the sauce if it doesn't seem like enough (though it should be, we are still sometimes greedy for more).

  • - 8 oz. uncooked noodles of your choice (We usually use regular pasta, but rice noodles are both customary and more delicious)
    -  2 to 3 tablespoons oil
  • -  1 to 1.5 pounds boneless skinless chicken breasts, cut into bite-sized pieces
  • - 1 large onion, diced
  • - 1 tbsp. freshly pressed garlic (about 4-5 cloves)
    -  a couple cups of broccoli, cooked and drained (add in any vegetables you like-- peppers are usual-- but we use broccoli)

KUNG PAO SAUCE INGREDIENTS:

  • - 1/2 cup low-sodium soy sauce
  • - 1/2 cup peanut butter (crunchy is best, because it already contains peanut pieces)
  • - 1/4 cup rice vinegar
  • - 1/2 teaspoon ground ginger
  • - 1 tablespoon sesame oil
  • - brown sugar, to taste (we prefer a sweet-spicy kung pao, so we use more than we should)
  • - 1 tablespoon (or more) cornstarch dissolved in a bit of cold water
  • - ground cayenne or red pepper flakes, to taste (I prefer flakes; just remember that the longer the food sits, the more heat the flakes will release)

  • - additional peanut butter, to taste

    - toppings, if desired: chopped, toasted peanuts and/or sesame seeds
Directions:


  • 1.  Make Kung Pao sauce by combining all ingredients except cornstarch together over medium-low heat until combined. Add cornstarch and cook until thickened slightly. Add more peanut butter, brown sugar, and cayenne/red pepper flakes, to taste, and set aside. (I like mine with quite a bit of sweet and heat.)

  • 2.  Cook and drain broccoli, set it aside, and then start boiling pasta. Cook pasta until al dente, toss with a bit of oil, and set aside.

  • 3.  Cook chicken and onion in oil over medium heat until done, then add pressed garlic and cook until fragrant, about thirty seconds to one minute. Combine broccoli, chicken mixture, and sauce. Either toss sauce/chicken mixture with the cooked pasta or top pasta with the mixture. 

  • This dish is good hot, lukewarm, or even cold. If you want it hot, lightly heat all ingredients together in a pot, while stirring, until heated through.

    If desired, top with chopped peanuts or sesame seeds.

Friday, February 19, 2021

Curried Pumpkin Soup with Chicken


(*To note: This picture actually shows curried butternut-pumpkin soup. This recipe will make a more orange soup. Close enough.)

A recipe of sorts, based on this. Makes a big ol' pot of delicious soup! The amounts given are loose, and I always add more spices, to taste, as I'm making it. I highly recommend tasting frequently as you cook. That's how I maintain this robust figure! :)

We have enough pumpkins for perhaps one more pot. I will miss it when they are gone, and will probably make it using butternut squash, instead.

Curried Pumpkin Soup with Chicken

-6 small New England sugar pie pumpkins, halved, de-seeded, and roasted until flesh is tender

-a stick of butter

-3 onions, finely chopped

-a large head of garlic (a full head, not one clove), pressed

-2 tbsp. yellow curry powder, more to taste

-1/2 tsp. grated nutmeg, more to taste

-a couple of tablespoons freshly minced ginger

-1/2 tsp. ground cayenne (optional), to taste

-1 tsp. salt, to taste

-1/2 tsp. ground black pepper

-6 cups chicken bone broth (or stock/broth)

-1 can full-fat coconut milk

-additional cow's milk or cream, as needed

-several pounds boneless, skinless chicken breasts, sliced into very thin strips

-chopped cilantro, if desired

-pumpkin seeds for garnish, if desired, either toasted from the pumpkins or green pepitas given to you by your mother-in-law :)


Directions:

1. Scoop the cooked pumpkin flesh out of shells and puree in batches in the blender with enough of the bone broth and/or coconut milk to help blend evenly. Place in a pot and stir in the remainder of the broth and coconut milk. Add additional cow's milk or cream until you reach the desired consistency. 

2. Saute the chopped onions in the butter over medium heat until soft and translucent. Add the minced ginger and pressed garlic until fragrant. Add to pot with pumpkin puree.

3. Add remainder of ingredients (except pumpkin seeds) to pot and heat over medium-high heat, stirring occasionally, until chicken is cooked through.

If desired, add pumpkin seeds for garnish.

Glow-in-the-Dark Turmeric & Coconut Fish Curry


Seriously, that fluorescent yellow around the edges of the bowl is not a trick of the camera!

Here's another recipe based on someone else's concoction, with the specialty ingredients omitted.
This is more of a sweet curry than a spicy one, and it's the perfect winter comfort food, only healthier than most.  I usually top it with a sprinkle of cayenne to add a little heat.

We double the following, and it serves our family of 12.

Ingredients:

  • -1 lb. mild white fish (we use tilapia)
    -1 onion
    -2 tbsp olive oil
  • -4 garlic cloves, or more, pressed
  • -1 tbsp grated fresh ginger
  • -lime juice, to taste
  • -1 can full-fat coconut milk
-1 cup chicken stock/broth
-ground cardamom, to taste (if desired)
  • -1/4 tsp cloves, ground
    -2 tsp ground coriander
  • -1 tbsp ground Turmeric, or to taste (we buy it in bulk and just dump a bunch in until it tastes good
  • -1 tsp. ground cumin
    -fresh cilantro (we use fresh, frozen, chopped from summertime)
  • ALSO, SALT, TO TASTE!!! (Edited on 12/09/2025 because my married daughter Mildred just made it and told me I forgot to include salt in the recipe. 😂)

-Basmati or white rice (we cook four cups dry for 12, so 2 cups dry should be enough to easily serve six)

Directions:
1. Saute chopped onion in olive oil over medium heat until soft and translucent. Add grated ginger and pressed garlic and saute for about one minute until fragrant.

2. Add lime juice, coconut milk, chicken stock, and spices, and cook until heated through. Add thawed fish and cook until done. Once fish is cooked (this will not take long), break into chunks with a spoon and then add in the fresh (or frozen) cilantro.

3. Serve over rice.


Romantic Thai Red Curry (19!)


I'll try to get an appetizing shot next time we make this, but for now, a split-second shot of the last bowl.

Millie first made this for John's and my 19th anniversary meal (nineteen years...wahoo!). She's heard me rave about Thai red curry since John took me to a Thai restaurant several years ago, and now there's no need to go to restaurants!

We loosely follow the recipe found here but omit a few of the rarest ingredients, making this a definite splurge meal but not so excessive that we can't still make payments on our house, which is just the right balance for a nineteenth anniversary. We omit the butternut/pumpkin and green beans to streamline it, substitute lime juice for the kaffir lime leaves, and regular basil for the Thai basil. I'm guessing our version is a greatly dressed down version of Thai Red Curry, but it's doable, and it tastes close enough to the restaurant version to make me swoon and eat it for three meals running.

We double or triple these amounts, but I'm putting in the original amounts with our alterations. Most of the children like the rice/curry ratio to heavily favor the rice. I'm the opposite and eat the curry as a soup with just a small amount of rice mixed in. Slurping is encouraged.


Red Curry Paste

-one can of Maesri Thai Red Curry paste (the cheapest, and, according to the recipe's author, the best!) *USE LESS IF YOU DON'T LIKE HEAT. The author recommends 5-6 tbsp. or less, to taste. We use the whole can, which makes me happy and most children unhappy.

-2 large garlic cloves, minced
-2 tsp. fresh ginger, finely grated
-1 tbsp. lemongrass paste (found a tube in Walmart's refrigerator section, and it lasts for several big curry batches)


Thai Red Curry

- 1 cup chicken broth/stock
-14 oz. full-fat coconut milk
-a splash or two of lime juice, to taste
-1 tbsp. sugar
- 1 tbsp. or so chopped basil, if desired (we just dump in a bit of chopped, frozen, garden basil, to taste)
-2 tsp. fish sauce, plus more to taste (one bottle will stretch a looong way in curries)
-boneless, skinless chicken breasts, cut into very thin slices-- as much or as little chicken as you want. More is better. :)

Jasmine rice, cooked

Cilantro leaves, for garnish


DIRECTIONS


  • Heat oil in a large, heavy skillet over medium-high heat.
  • Add canned curry paste, garlic, ginger, and lemongrass paste and cook for about 2 minutes so it "dries out." 
  • Add chicken broth and stir to dissolve paste. Simmer rapidly for 3 minutes or until liquid reduces by half.
  • Add coconut milk, lime juice, sugar, basil, and fish sauce. Stir, then bring to a simmer and turn heat down to medium. Cook until sauce is almost the thickness you want, and then add sliced chicken. Cook for several more minutes until chicken is cooked through. 
  • Taste curry and add more fish sauce for saltiness, as needed, and/or more sugar for sweetness.
  • Serve over jasmine rice, garnished with cilantro leaves, if desired.


Friday, January 15, 2021

Italian Wedding Soup


(The last half-eaten bowl of soup-- more delicious than it looks.)


Before I type the recipe, here's an extra paragraph in case you haven't made bone broth before.

Homemade bone broth is the base for almost all of our soups these days, and it turns a good soup into an extraordinary one, with minimal effort.

First of all, SAVE THE BONES. ALWAYS.
After a meal, we just throw the bones in a ziplock bag and store them in the freezer until needed.

To make poultry bone broth, take a turkey carcass, a roast chicken carcass, or any combination of bones thereof and place in a crockpot. Add an onion, quartered, about 6 cloves garlic (split), a stalk of celery cut into chunks, a carrot or two, cut into big chunks, half a dozen peppercorns, a couple of teaspoons of salt, and a tablespoon of apple cider vinegar (this will help the bones break down more easily so you can get all the goodness of that marrow). Add about a gallon of water (I usually just fill to top of crockpot) and simmer on low heat for about 24 hours. Strain into a bowl for use.

*I also now make bone broth in our instant pot when I forget to do it the day before and am feeling time's pinch. It only takes a couple of hours in the instant pot, but when I remember, I prefer using the crockpot.


ITALIAN WEDDING SOUP

This is a sloppy "recipe," as it's basically my notes to Susannah typed word-for-word. I can always come back on here later and type it up in proper recipe form.
A couple of notes: 
1. The ingredients are in bold
2. These amounts are general. As I told Susannah, throw in whatever you want! You can't ruin it!
3. If you don't have a huge stockpot and want to fit this soup in a normal pot, cut it all in half. This fed 11 Owen people for supper with leftovers for the next day's lunch.

One gallon+ of turkey or chicken bone broth (or store-bought chicken stock, though it will cost more and taste less) for the soup's base.

For the meatballs:

2-3 pounds ground turkey (could use pork or beef)
1 and a half pounds sweet Italian sausage
1 cup dry bread crumbs
(ours are plain homemade ones; if you're using storebought seasoned, keep that in mind when you shake in the dried seasonings at the end.)
3 eggs
1/2 grated Parmesan cheese
1 large onion, finely minced
(we used food processor to turn it to mush)
6 plump cloves garlic (turned to mush with the onion)
1 tsp. salt
a couple of shakes each of dried sage, rosemary, thyme, and basil

Mix all these together by hand in a bowl. Shape into smallish meatballs and bake on tinfoil-lined, rimmed baking sheets for about 15 minutes at 350 degrees, or until cooked through.

Slice 5-6 carrots into coins and set aside.
Thaw 1-2 bags of frozen spinach (we used two 12 oz. bags) and squeeze out excess liquid. In the summer, use fresh!

Meanwhile, sauté about one-two cups chopped celery and one large onion in a couple of tablespoons of olive oil and butter until softened. Add the celery mixture to the bone broth, add the sliced carrots, and cook until carrots are almost soft. Add 12 oz. small-shaped pasta (acini de pepe is standard, but we just used egg noodles broken in pieces) and spinach and cook until the pasta is al dente. Add the meatballs, add additional salt and pepper (and garlic powder, rosemary, thyme, and basil), to taste, if needed, serve, and slurp.


Thursday, July 25, 2013

Asian Slaw with Noodles-- A Non-recipe


I remember really liking this one.  From what I can recall, I sort-of did the following:


-chop some cabbage
-julienne some carrots
-slice some crisp sugar-snap peas in diagonal chunks

-cook some pasta (yep, pasta.  If you have fancy Asian noodles, use those instead!)
- Now, chill the pasta.

In a small bowl, whisk together the following, plus whatever else I'm forgetting:
-soy sauce
-rice wine vinegar
-brown sugar
-fresh, minced garlic (or garlic powder, for a milder flavor)
-cayenne powder or red pepper flakes
-salt and freshly ground black pepper
-a glug or two of dark sesame oil
*Edit: I forgot to type fresh ginger, grated or pressed!
Just saute the ginger and fresh garlic in a bit of oil before tossing with the rest.
All to taste, of course.  

Toss the vegetables, chilled pasta, and dressing together.  Munch away!  It's the perfect meal to make once the peas ripen.


A non-recipe: Roasted Butternut, Kale, and Balsamic pasta


Sorry for the gross picture.  It was dark outside, but there was no way I was going to save the last helping of this for daylight the next morning.  I made this one night in lieu of the garlic-butter-butternut pasta I am in love with (which is essentially roasted butternut, caramelized onion, and a slew of garlic, all swimming in a cup of butter and olive oil).  This was a yummy, healthy alternative that I made several times over the winter.


-1 large butternut squash, cubed, roasted with 1 and 1/2 teaspoons olive oil

-1 large onion, diced and then caramelized in 1 tbsp. olive oil
-1/2 head garlic (about 2 tbsp. minced?)

-2 cups kale, chopped and ribs removed

-3 tbsp. balsamic vinegar
-2 tbsp. brown sugar (use less or add more vinegar, according to your tastes)
-1/2 cup water into caramelized onions to cook the kale in

- 1 box thin whole wheat spaghetti, cooked to your liking

1.  Preheat oven to about 400 degrees and roast the butternut squash until soft and slightly blackened.

2.  While the squash is roasting, caramelize the onion in the olive oil, then add the freshly minced garlic and cook over low-medium heat for a minute or two.  In a small bowl, whisk together the sugar and vinegar.

3. When onions/garlic are finished, add to the pan
- 1/2 cup water
- the 2 cups kale
- the vinegar/sugar mixture
along with salt (1/2 to 1 tsp.) and pepper (1/4- 1/2 tsp.), to taste.

4.  Cook until kale is heated through and slightly limp (but not soggy!) and serve over warm pasta...with butter, if desired.

For Benjamin Boyd: White Bean Chicken Chili with Cilantro

I have no picture of this yet, but since you wanted it, here it is!

The first time I made white bean chicken chili was for a ladies get-together here on the hill.  I made two enormous crockpots, but in the rush of cleaning and baking and preparing, I didn't even taste it before people spooned it into their bowls.   When I finally sat down with a bowl and commented on how bland it was, a guest politely suggested I add more salt and top it with cheese.  You see, in my rush, I had forgotten to add any salt.  Everyone had already finished most of their bowls, and I felt like a complete idiot.

Never again, folks.

The second time I took it for a meal with friends, I wrote down what I threw in, I tasted it before leaving, and, by golly, I added salt.


Here you are, Boyd.

White Bean Chicken Chili with Cilantro

- 4 cups dried Great Northern beans, cooked until soft and drained

-4 boneless, skinless chicken breasts, boiled until done and then shredded with a fork

- bean broth and chicken broth (or water from boiling the chicken breasts + bouillon) for the soup base
 - 4 tbsp. butter and a bit of extra virgin olive oil
-2 medium onions
- about 8 cloves fresh garlic, pressed or minced
- around 6 tbsp. all-purpose flour
- 1 1/2 to 2 cups whole milk
 - 8 oz. sharp cheddar cheese, grated

- 1/4 cup fresh, chopped cilantro
- 1 tbsp. fresh oregano, chopped
- 1 - 2 tsp. salt
- 1 - 2 tsp. ground cumin
- 1/4 - 1/2 tsp. freshly ground black pepper
- a dash of chili powder
- ground cayenne, to taste
- about 4 cups corn (I used stuff frozen from last summer)


*additional grated cheese and chopped cilantro for garnish, if desired.

1.  I usually use a mixture of chicken broth (or chicken cooking water + bouillon) plus some bean cooking water as my soup base, and then add the beans and shredded chicken.

2. Next, saute onion in the butter and olive oil until soft; add minced garlic and cook for another minute.

3.  Stir in flour and cook for about 30 seconds to start your bechamel.  Add the milk and whisk until all flour lumps are dissolved (onion and garlic lumps will still be there!).  Cook over medium heat until thickened and bubbly, stirring constantly, and then add the grated cheese.  Stir until melted.

4.  Add bechamel (cheese sauce) to the bean and soup base and add spices.  Add corn and heat through.  Taste and adjust spices, as desired.  DON'T FORGET THE SALT.


Friday, March 08, 2013

The Most Heavenly Vegetarian Sandwich for Meat Lovers: A Non-recipe

Two summers ago, John ate lunch with a work fellow, and he had a memorable vegetarian sandwich. Since he saved a few bites for me (lovely man), I also had a memorable vegetarian sandwich. Now, let it be known that I love meat even though we don't eat it regularly, but this sandwich was tops. Tops! That same summer, I attempted to recreate it with vegetables from our garden, and, not to toot my own horn, I made a pretty mean sandwich. By "pretty mean," I mean "pretty darn near perfect."

(Toot.)


To begin, here's an ingredient list:
Oh, wait.  It was TWO SUMMERS AGO.  I don't remember the exact amounts, so you're on your own here.  Do you like how I absolve myself of any liability if your sandwich doesn't turn out pretty darn near perfect?

-two red peppers, roasted, with seeds, ribs, and skin removed, then cut into strips
-one average-sized eggplant, sliced into 1/4- 1/3-inch slices (next time I'll also peel the thing)
-one enormous onion, sliced into thin rings (I used yellow, but I wish I'd grown a gourmet red)
-fresh garlic, many cloves, minced
-fresh basil, cut chiffonade
-balsamic vinegar
-salt
-pepper
-a bit of sugar
-extra virgin olive oil
-free WILD MUSHROOMS! (...or any kind of mushroom, or mushrooms you have to pay for, or omit the mushrooms entirely. You decide.)
-crusty, dense bread given to you by your mother (It could be either purchased or baked bread, I suppose, but I can't guarantee the results if it's not bread given to you by your mother.)


First, roast your peppers. Google instructions if you've not done it before. I'm too slothful to show you anything but the final product.


Toss eggplant slices in a bowl with balsamic vinegar, basil, minced garlic,


Stir in the roasted red peppers.


Go into the woods and search for wild mushrooms OR grab your free jar!  (Or buy one, but, again, I can't guarantee the results.)  Dump as many drained mushrooms as you like into the bowl and stir together to coat.  Season it all with salt, pepper, and sugar, to taste, and then spread in a single layer on a rimmed baking sheet.  Bake in a hot oven (400 degrees?) until eggplant is soft and the rest is hot and steaming.


While the eggplant is baking, take your sliced onion, throw it in a frying pan with a couple of teaspoons of extra virgin olive oil, and cook until onions are caramelized, adding salt and stirring as needed.

When onions are finished, toss with the eggplant mixture in a big bowl, lightly toast your crusty bread, and top with a hearty mountain of the eggplant mixture.


Top with a second slice of bread if you want, and then act like Dagwood.
Watch out.  It may be messy.


Thursday, March 07, 2013

Kale, Sweet Potato, and Caramelized Onion Pizza

Buildabelly doesn't accurate reflect my family's diet, but, hoo boy, I wish it did!  We'd eat lots o' meat (MEAT!), cheesecake, butter, butter, butter....more butter. Did I mention sugar? Sugar, sugar, sugar.  Sadly, our diets are more lackluster and barren. (What?  Our diet is cheaper and healthier?  Who cares!)  We do have pizza on most Friday nights, which, in summer, we top with all manner of garden vegetables, but in winter, it's cheese pizza every blessed week.  Once in a while I toss on roasted broccoli or caramelized peppers and onions, if we find a good sale, and there's the occasional white spinach pizza for good measure.  Yummy.  Boring.

 Enter kale and sweet potato pizza, a riff on this recipe.
Before you proceed, let it be known that while John and I loved it, the girls would have preferred yummy, boring cheese pizza, but what do they know?


Ingredients:

-Your favorite pizza dough recipe (I used 50/50 mixture of white and whole wheat flour)

Topping:
-2 sweet potatoes, sliced thinly (I use a mandoline slicer) tossed with 2-3 tsp. olive oil and a hearty sprinkling of sea salt.  Spread in a single layer on cookie sheet and oven-bake at about 400 degrees 'til centers are soft and edges are lightly golden crisp (in my oven, this only takes 10 minutes or so for thin slices)
-2 onions, sliced into thin rings and caramelized with  2-3 tsp. olive oil 'til sweet and golden brown.  Add salt and pepper, to taste.
-6-7 cloves fresh garlic, minced, and added to onions for last several minutes of cooking until soft
-several generous handfuls kale, torn and ribs removed, tossed with 1 tsp. olive oil, 1 tbsp. or so balsamic vinegar, and a hearty pinch of sea salt
-shredded mozzarella

Onto your unbaked pizza crust, spread the caramelized onions, spread the kale, layer the sliced sweet potato slices, and top with shredded mozzarella cheese before baking as you usually do.  (High heat oven, baking stone, cookie sheet...you pick!)


I had intended to add some ground rosemary to this, also, but I plumb forgot.  Next time I will, because (sorry, girls) I will be making this again!


Blast-from-the-past Pizza Pods a la Buffalo, NY: A Non-recipe


While John was getting his master's degree in Buffalo, we'd go to the Pizza Plant when his family visited, and I would eat the most delicious pizza spin-off ever created-- The Chicken Souvlaki Pizza Pod. I love pizza.  I love chicken souvlaki even more than pizza, so this was a match made in heaven.  The pizza pods at the Pizza Plant (say that 20 times as fast as you can) were essentially creatively-stuffed calzones in a trademark pod shape but executed in such a brilliant way as to become something new-- PIZZA PODS.

Anyway, to bring us back to earth with an abrupt crash, I've never made a chicken souvlaki pizza pod.  Here's a non-recipe for the spinach pods I occasionally make.


Ingredients:
-Pizza dough recipe, your choice
- A bag of frozen, chopped spinach, drained well
- Lots of fresh garlic cloves, minced and cooked in a bit of olive oil over medium heat until softened slightly. (When I say lots, I mean LOTS. We like garlic around these parts.)
- Grated Parmesan cheese
- Salt and pepper in liberal amounts
-Your favorite homemade or storebought Italian vinaigrette
- Lots of mozzerella cheese, shredded (If you've got feta, go for it!  Do it!  Do it now!)
-I've only done this once, but to make to-die-for spinach pods, grill up some of these and add them to the mix.  

In a large bowl, toss the well-drained spinach with the garlic and parmesan.  Drizzle many glugs of the Italian vinaigrette, to taste, and then add s + p, to taste.  Stir in the shredded mozzerella and/or feta, in the amount you desire.

Divide the prepared dough into fist-sized balls (or larger, depending on how large a pod you want to eat).  On a lightly flour-dusted surface, roll out very thin in an oblong shape and heap a mound of filling down the center, leaving at least a one-inch margin around the edges. Roll up, pinching the dough together as you go.  When it's sealed, carefully move to cornmeal-dusted baking stone or sheet*, seal-side up, and bake at a high heat until dough is done.  (If you've made pizza before, just do whatever you do to normally bake your pizza.)
*If you're using a cookie sheet instead of a preheated stone, you can roll the dough out right onto the cornmeal and save yourself the trouble of moving it.

Also, here's proof that a few times a year, we even buy pepperoni.
Yum.
Long live the pig!


(I rolled this one out too thickly.  Oops.)
 

Tuesday, March 05, 2013

Spicy Ethiopian Chicken


I don't remember why I called this dish Ethiopian.  I remember thinking it was funny for some reason, but that reason has disappeared in the year and a half since I made it.  Perhaps because of the cardamom?  Perhaps the ginger, the allspice?  Perhaps because I thought it elevated the recipe to new, hoity-toity heights?  Who knows. I do remember that it was savory and delicious enough for me to sip leftover broth from a spoon, and that's always a good sign, right?

Here's a hoity-toity Ethiopian dish.  Make it, gobble it, and feel like a globe-trotting, culinary superstar! Oh, and here's another small and funny thing.  When I'm cooking or baking something off the cuff (which happens nearly daily), and I think it might turn out to be a keeper, I quickly jot down approximations of what I dumped into the dish/muffins/cheesecake, and then I stuff that scrap of paper into my recipe box of doom.  As near as I can tell, I just found the right garbled scrap of paper for this snapshot, but it's not labeled, so....

Oh, bother.  Throw caution to the wind!  Live with your eyes wide shut!  Ride the winds of danger!  Make this for supper tonight!


Abigail-Has-Never-Before-Flown-in-a-Plane Globetrotting Superstar Cajun-Ethiopian Chicken with Rice   (I realize the title could use some work.)

For the rice:
-3 cups dry rice, cooked in the manner of your choosing

For the rest:
-chicken broth (or water/bouillon)
-1 large white onion
-1 tablespoon freshly minced ginger
- about six cloves fresh garlic, minced
-1 and 1/2 tablespoons, or thereabouts, homemade Cajun seasoning (The recipe I use can be found here; just scroll to the bottom.  Thanks again, Emeril!)
-3/4 teaspoon ground cardamom
- 1/2 teaspoon ground allspice
- 1 can diced tomatoes with juice
- 3 chicken breasts, cubed in large chunks

Aaand that's all I have jotted down on the scrap of paper!  Brilliant, isn't it?

However, here's what I suggest you do with the above ingredients.

1. Dice the onion and saute it in a few teaspoons of extra virgin olive oil until softened and slightly translucent.  Add the minced ginger and garlic and cook over medium-low heat for a few minutes until the garlic softens and flavors are blended.

2. Dump in several cups of chicken broth, diced tomatoes and juice, spices, and the chicken pieces and simmer, covered, until the chicken is juicy and cooked through.  Add additional water, as needed, to keep the fluid levels constant.

3.  Serve piping hot beside the rice.

4.  Sip the leftover savory juices from a spoon.

5. Hop on a plane, fly to an exotic place, and think of me in Nanticoke.

Friday, August 19, 2011

Spicy (or Not-so-spicy) Summer Stirfry a.k.a. You Should Make This Tonight!


I think we just ate my favorite stirfry yet, probably because it's a garden-harvest-vegetarian riff on Martha's beef bulgogi recipe from five years ago, and with the addition of sesame oil. (I'm sorry for the weird color cast; I took this picture at dusk because I was too busy eating beforehand.)

This is a sweet-spicy-sesame-y stirfry that tastes...um...simply smashing! So lame, I know. Sometimes I have alliteration spasms. It's a disorder. (ASD.)

Cook up some brown rice. During the forty minutes you wait for it to cook, gather

a few tablespoons olive oil
one onion, chopped
about 4 carrots, thinly julienned

1 small-medium zucchini, thinly julienned
1 small-medium yellow summer squash, thinly julienned*
about 5 cups sugar snap peas (the eat-the-pod-and-all kind), strings removed
2 tbsp. freshly minced garlic (about 12 cloves)
1 and 1/2 tbsp. finely chopped or grated ginger
3/4 cup soy sauce
1 tbsp sesame oil (or more, if you like a really heavy sesame flavor)
6 tbsp. brown sugar (a bit more or less, to taste)

1 tbsp. cornstarch dissolved in a few tablespoons of cold water
ground cayenne or red pepper flakes or fresh hot peppers (ribbed, seeded, and chopped), to taste

In a few tablespoons of olive oil, saute the onions and carrots until the onion is translucent and carrots are nearly crisp-tender (if using fresh hot peppers, add then in, also). After mixing the soy sauce, sesame oil, and brown sugar in a small bowl until sugar dissolves, add the next eight ingredients with 1/3- 1/2 cup water to the pan and cook over medium heat until vegetables are crisp tender. Stir in the cornstarch/water mixture and cook until sauce thickens. Add cayenne or red pepper flakes to taste.

We loved this, especially the sweet crunch of the sugar snap peas.

*A mandoline slicer really does beat all. John picked mine up for ten bucks several years back, and I've been using it to slice and julienne like one obsessed, which is probably because I am obsessed. Mine looks similar to this, except that it didn't cost forty dollars. If you find one for a reasonable price, grab it! They are just about as handy as hands.

Tuesday, August 16, 2011

Cheesy Zucchini Fritters

Of course, they're healthy. Why do you ask?

These are extremely flavorful, and they use quite a lot of zucchini, which is good news to all of you gardeners around this time of year. Quit leaving zucchini on people's doorsteps and in unlocked cars, already! You should make piles of these greasy fritters, instead.


I gleefully ate four or more of these for lunch and then felt sick for the next hour. They were that good. I'd like to try zucchini fritters that are like potato latkes, except made with zucchini and extra spices, but my first attempt was a bit more...indulgent. The cheeses turn the fritters into royalty, and spices can easily be adjusted to suit your tastes. I recommend serving a pile of fresh vegetables alongside these for lunch. I did not do this, but I bet if I'd tempered the fritters with something less decadent, I would've been fine with my gluttony.

(And once again, I showcase my stellar photography skillz with a cloth napkin and a zucchini blossom. Someday I'll be original, but that day is not yet here.)


2 medium-large zucchini, about ten cups grated
1 large onion, minced
1/4 - 1/2 tsp. dried thyme leaves or about 1 - 1 and 1/2 tsp. fresh chopped thyme
1 tsp. salt
1/3 tsp. black pepper
1 and 1/2 tsp. garlic powder
1 cup all-purpose flour
1/2 cup finely ground cornmeal
2 eggs
3/4 cup parmesan cheese
3/4 cup mozzarella cheese

Grate the zucchini with a medium hand grater (or whatever you want to use) into a large bowl until you have about ten cups worth and then squeeze out as much excess fluid as you can. Stir in the cheeses and eggs. In a small bowl, mix dry ingredients together and then stir into the zucchini mixture.

Heat a few tablespoons of canola oil in a heavy-bottomed pan over medium-high heat (until flour sizzles) and drop batter into pan in amounts small enough to make fritters about the circumference of an orange. Fry until the bottom side is golden brown, flip, and cook the remaining side until golden brown and cooked through.

The only downside to these cheesy fritters is that it might take a fritter or two to get the knack of flipping them without them falling to pieces. Once the mozzarella cheese melts, the stability of the fritter is shaky until it's cooked enough to gain a bit of firmness, and I found smaller fritters easier to flip than the big ones. I like the zucchini ratio to be equal to or greater than the pancake amount, but if you're really struggling, just add some more flour, cornmeal, and spices, to suit.

Thursday, August 11, 2011

A Delicious Mess of Pottage

...or thereabouts, Esau.


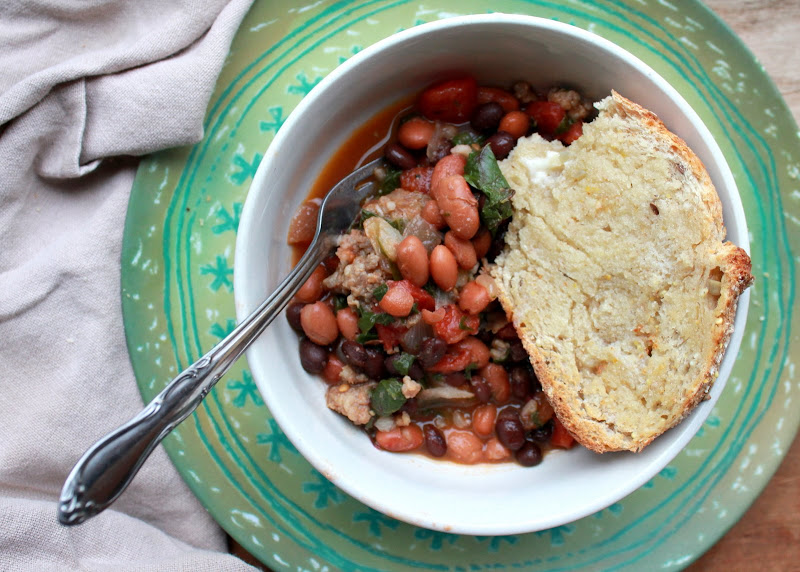
A mess of faux pottage is prepared similarly to kale and beans, only with a mixture of pinto and black beans, the addition of diced tomatoes, beet greens in place of the kale, and ground rosemary, to taste, added to the onions, garlic, salt, and pepper. Important, as well, is the addition of 2 small links of sweet Italian sausage I found in the bottom of our freezer. Cook the sausage at the same time as the onions, and proceed from there.

I used more water in the pot than usual in order to make a flavorful broth. Chicken broth would taste good, as well.


The broth necessitates some buttered, crusty bread for mopping. Don't forget!


Here's Another Idea! Roasted Eggplant and Red Pepper Pizza (with Garlic and Basil, Because It's a Pizza)


Here's what it looks like before it's baked, when the basil looks green and inviting instead of dark and withered. (My cookie sheet is loaded with cornmeal because it's my pizza peel; it works like a charm, thank you for asking.)


Anyway, prepare your favorite pizza dough crust. I use this one, because a thin crust couldn't handle the boatload of toppings. This time, as I often do, I substituted whole wheat for half of the flour.

Now, you should also prepare your favorite pizza sauce. Do you want my recipe that's not a recipe and that changes according to my mood or the weather? Here you go.

1 quart of home-canned tomatoes, drained
1 small can of tomato paste
a healthy splash or two of white cooking wine
1-2 tsp. salt
2-4 tsp. sugar
a whole mess of freshly minced garlic (and I do mean a WHOLE MESS-- usually at least 1/2 a head of garlic)
depending on the pizza, I add one or more of the following, to taste
red pepper flakes
whatever fresh or dried herbs I desire (basil, rosemary, oregano, parsley, etc.)

The End.

Oh, wait. I was showing you a pizza with toppings, wasn't I?

Continuing...

So now you should have your favorite dough prepared and your favorite pizza sauce prepared. On to the toppings:

-Roast about 2 red peppers, then remove the ribs, seeds, and skin, before cutting into strips. (I broil mine to roast them. If you've got a gas oven, you can roast them directly over the flames. If you've never done this, please google a real cook who isn't too lazy to give you a tutorial in pictures.)

-Cut an eggplant into slices, about 1/4-inch thick.
Toss the slices in a bowl with some drizzles of olive oil, and then roast in your oven until soft and nicely browned, about 15 minutes, turning once (I quickly broil mine to cut down on time spent.)

-In a pan over medium-low heat, pour a few tablespoons olive oil, a few cloves freshly minced garlic, and a few shakes of red pepper flakes, if desired. Warm until heated through and set aside.

Okay. Shape your pizza dough, top with red sauce, sprinkle with mozzerella cheese (and parmesan cheese, if desired), and then layer on the eggplant slices. Layer the roasted red pepper strips on top of the eggplant, and then drizzle the olive oil/garlic/red pepper (if desired) mixture on top. Place 10-12 fresh, torn basil leaves on top and slide off of your cornmeal-dusted fake pizza peel onto a five-dollar pizza stone (it works like a charm; thank you for asking). Bake in a preheated 500-degree oven for as long as it takes. If you've made pizza before, bake according to your oven's quirks, taking into account the fact that this is a thickly loaded pizza. I have a quirky oven and hesitate to give baking times, for fear that I'll ruin the meal for people with normal ovens.

Enjoy!


The End. For Real This Time.


Monday, June 27, 2011

Here's an Idea: Rosemary and Garlic Flatbread with Cherry Tomatoes


For easy and delicious summertime flatbread, prepare dough, let it rise until doubled, form into a round, and brush generously with extra virgin olive oil. Top with lots of freshly minced garlic, shredded mozzarella, chopped fresh rosemary, and several hearty pinches of coarse sea salt. If the cherry tomatoes are producing, halve some and pile them on, too! We ate this a lot last summer. *Sometimes, I knead minced garlic and chopped rosemary into the dough, as well.

Can you tell I'm ready for our garden to drip with goodness? The plants are spindly and timid, but I hope still. Eggplant-topped pizza, here we come!


Basic Pizza/Flatbread Dough (This is a thicker/puffier crust than this dough.)
The recipe calls for all-purpose flour, but I often substitute whole wheat for half of the flour, and the addition of a little gluten will increase the chewiness of the crust .
-2 and 1/2 cups flour (*More if desired; see below)
-1 tsp. salt
-1 tsp. sugar
-1 tbsp. yeast
-1 cup warm water
-1 tbsp. oil

1. Combine salt, sugar, yeast, then add water and oil. Let sit for proofing ('til frothy on top).

2. Mix yeast mixture with flour. Turn onto floured surface and knead until smooth and elastic. (*At this point, I sometimes work more flour--around 1/2 cup-- into the dough as I knead.)

3. Place in greased bowl, cover, and let rise in warm place until doubled in size. *If desired, the dough can be placed in the refrigerator at this point for a few hours or up to 24 hours. The flavor and texture improve, but I generally don't plan ahead enough for that these days. It's delicious enough as is, anyway.

4. Punch down and shape into a round, as thin or thick as you like, on a cornmeal-dusted baking stone or cookie sheet.

5. Top with desired toppings and bake in a preheated 450-500 degree oven until golden brown and crispy. (Use your judgment here. I always crank up the heat as high as my oven allows for pizza, but just bake it how you normally bake your dough.)

Sunday, June 26, 2011

Eggplant (or Zucchini!) Parmesan & Pasta


This lackluster snapshot is from last summer, but don't let it keep you from making the dish!

Dude has made this for us for the last two summers, and he learned how to make it from a bonafide Italian friend, about whose culinary talents an entire blog could (nay, should!) be written.

I've made it with both eggplant-- which is more typical and with which you may be familiar--and....here's the great part...ZUCCHINI! Any gardener knows why I'm ecstatic that this can be deliciously reproduced with zucchini. I love zucchini- love it- but even I reach the point when I look at overachieving zucchini plants and am tempted to just throw some of the baseball bat suckers in the weeds and be done with it. Since my pitiful eggplants are still more seedlings than plants, I'm afraid the zucchini version is most prominent in my future.

Here's a vague ingredients list. (Sorry, this is a whip-together meal. No precise measurements needed.)

You'll need
-Eggplant or zucchini
-A few eggs
-Some milk
-Bread crumbs and spices of your choice
-Parmesan cheese
-Shredded or sliced mozzarella cheese
-Fresh basil leaves
-Red sauce/spaghetti sauce of your choice
-Pasta of your choice
-A pot
-Some water to boil in your pot

If you make your own pasta sauce, it might serve you well to make it first. I usually fly by the seat of my pants with sauces, but my red sauce is a similar version to this pizza sauce, only with more garlic and less (or no) red pepper, and I use home-canned tomatoes in indiscriminate amounts, sometimes adding tomato paste for thickness.

Take eggplant or baseball bat zucchini and slice into 1/4- 1/2-inch thick coins. Place in a colander over a bowl and sprinkle with about a teaspoon of salt. Let sit for an hour to draw out excess moisture. (I usually skip this step with the zucchini. Horrors!) Pat dry and dip in an egg wash. The amounts will vary according to how much eggplant/zucchini you want to bread, but a rough rule is a few tablespoons of milk for each egg. Whisk together in a small bowl.

Take the egg-dipped vegetable slices and dredge them in your choice of bread coating. I usually use plain homemade bread crumbs mixed with a bunch of Parmesan cheese, along with salt, black pepper, garlic powder, and Italian seasoning, to taste. To up the ante, if it's summertime, and you've got fresh herbs growing, chop those and add them in place of the dried Italian seasoning (parsley, sage, rosemary, and thyme, basil, etc.).

To save time, at this point preheat the oven for broiling.
Also, begin boiling water in a pot in preparation for cooking pasta.
Add pasta as soon as the water is ready, and drain it when it is cooked al dente.

Meanwhile, in a heavy-bottomed frying pan, fry the vegetable slices in a few tablespoons of olive oil until crisp-tender and golden brown, flipping once. Drain on paper towels before placing on a cookie sheet. Spoon some sauce over each slice, layer with shredded mozzarella cheese (or, if you're fancy, mozzarella slices) and top with a large basil leaf. Place in oven and broil until cheese is melted.

Place a mound of your desired pasta on a plate, top with breaded eggplant/zucchini slices, and spoon red sauce over all. Eat, eat, eat. EAT!

I cannot begin to tell you how much I am craving this right now.
Zucchini plants, hurry up!