Showing posts with label Vegetables. Show all posts

Thursday, July 09, 2015

Roasted Cabbage with Balsamic Reduction


Our family loves roasted anything.  What is the magic that makes ANY vegetable irresistible with only olive oil, salt, pepper, and roasting?  I don't know, either, but I'm glad it exists, because we can gobble a whole head of cabbage prepared like this.

In addition to the olive oil and salt, this cabbage is drizzled with a balsamic reduction, which takes it from irresistible to EAT IT NOW!!!!

Roasted Cabbage with Balsamic Reduction
one head of cabbage, outer leaves removed
several tbsp. olive oil
salt and pepper
an oven for roasting

Balsamic Reduction (made speedier by the addition of sugar)
one cup of balsamic vinegar
2 tbsp. of sugar

Preheat oven to 400 degrees.  

Combine the balsamic vinegar and the sugar in a small saucepan over medium-high heat. Stir until the sugar is dissolved and then bring to a boil.  Reduce the heat and allow mixture to simmer, stirring occasionally, until the mixture is reduced by half.  Don't let it scorch when it nears the end.  It should be noticeably thicker now, and it will taste heavenly.

Prepare the cabbage by slicing it from top to bottom into 1-inch thick pieces (you can also cut it into wedges).  Drizzle with several tablespoons of olive oil (or brush oil on both sides), and then sprinkle liberally with salt and pepper.  Bake in the 400 degree oven for about 45-60 minutes, until tender and seared, turning once halfway through.  Toward the end, I drizzle on some of the balsamic reduction, and if the cabbage isn't dark enough for my liking, I just crank up the heat towards the end.  

When done, remove from oven, and top hot cabbage with as much balsamic as you like, which, if you're like me, is more than your fair share.
Curried Zucchini Soup


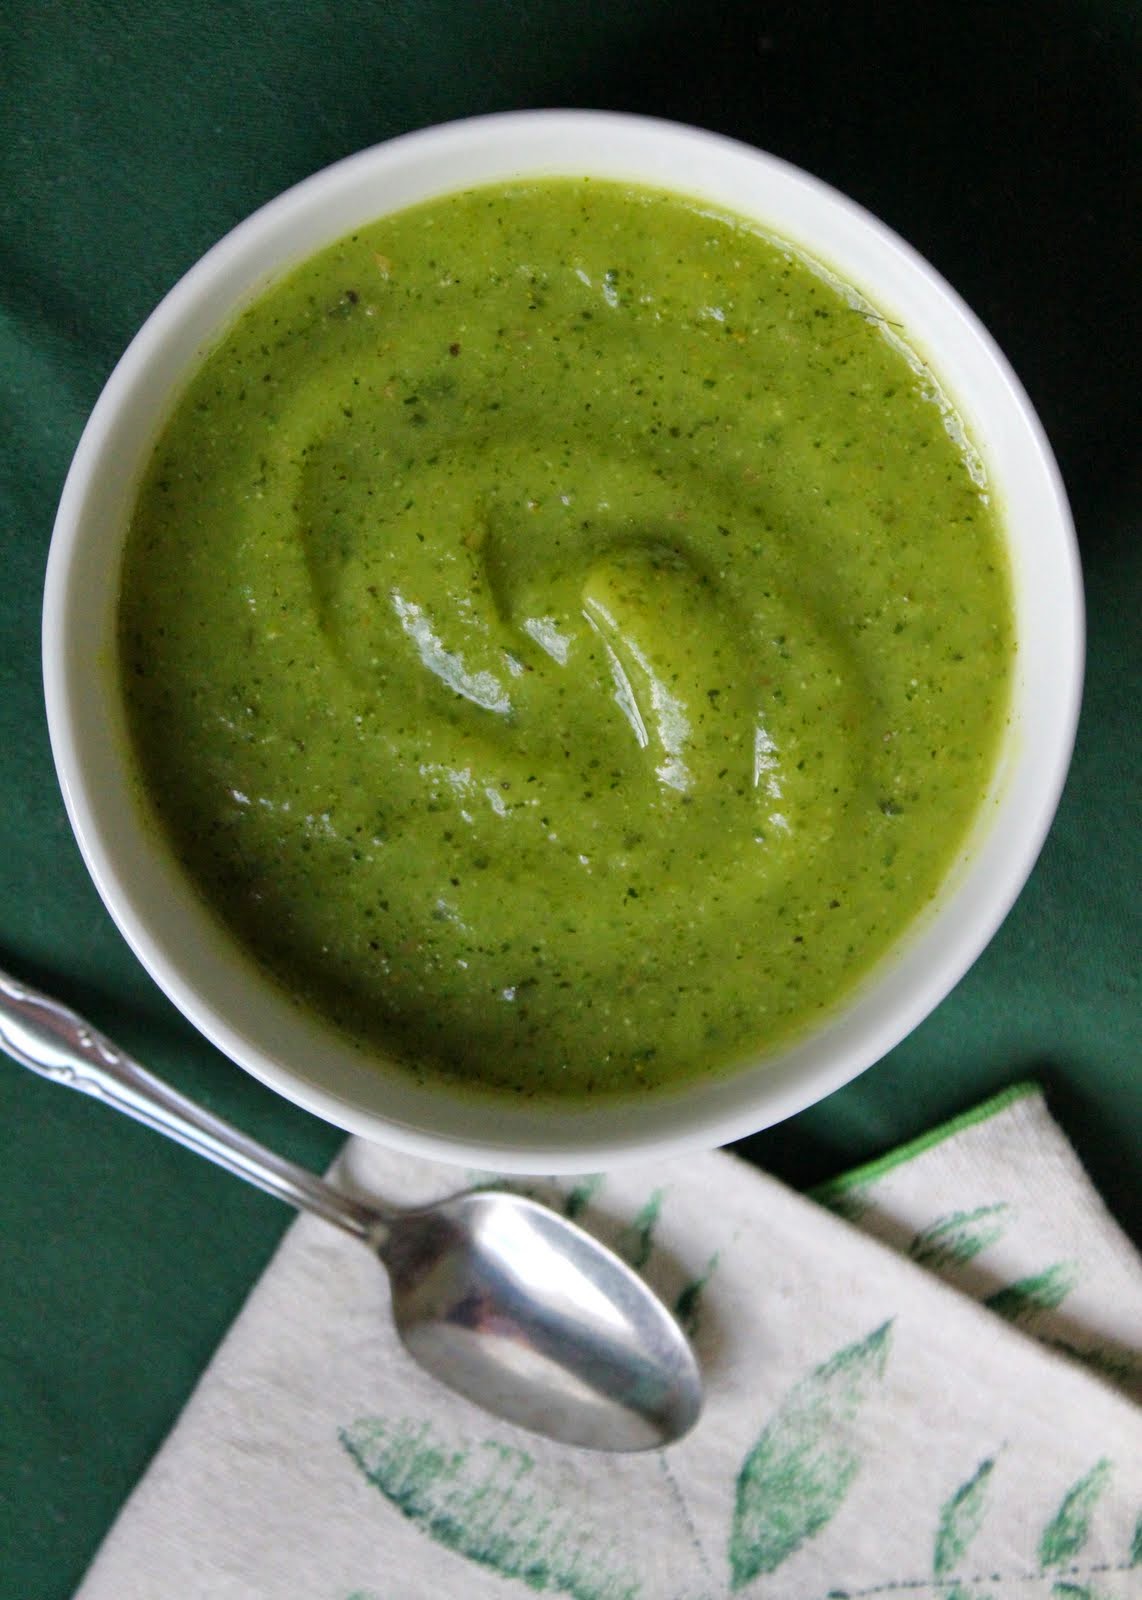
This recipe is most useful in mid-August through September, when one's intelligence is measured by how many ingenious ways one can use up the eternal zucchini harvest.  The children and I ate this nearly every day for lunch for a week straight last summer, and I didn't hear complaints until the end of the week, so that's something.  If one's family eats that much zucchini soup in one week, then the recipe's worth keeping.

It's best to eat it while shouting this poem all together.   Trust me.


*Notes: 

1.  After making it the first time, I just added ingredients, to taste, and threw in a ton more zucchini and chicken stock.  You do the same.  Also, I've never once chilled it before we eat it for lunch, but leftovers are even better the next day after the flavors have settled into the whole soup.

2.  I sometimes add diced potatoes to this, too, and blend them in with the zucchini, before adjusting the spices to suit.  

Curried Zucchini Soup (source: Emeril Lagasse, my best buddy)

4-6 servings

Ingredients:

1 tablespoon vegetable oil 
1 cup chopped yellow onions 
1 teaspoon minced garlic 
2 teaspoons curry powder 
1/2 teaspoon salt 
Pinch cayenne 
2 pounds zucchini, trimmed and chopped 
3 1/2 cups vegetable or chicken stock (we use chicken)
1/2 cup heavy cream (we probably just used milk)
Chopped cilantro, garnish, if desired

Directions:

In a medium pot, heat the oil over medium-high heat. Add the onions and garlic and cook, stirring, until soft, about 3 minutes. Add the curry powder, salt, and cayenne, stir, and cook until fragrant, about 30 seconds. Add the zucchini, reduce to medium heat, and cook, stirring occasionally, until soft, 5 to 6 minutes. Add the stock and bring to a boil. Reduce the heat and simmer until the zucchini is very tender, about 20 minutes. 

Remove from the heat. With a hand-held immersion blender, or in batches in a food processor, puree the soup. Return to medium heat and stir in the cream. Simmer for 3 minutes. Adjust the seasoning, to taste. 

Pour into a clean container and let cool slightly. Refrigerate until well chilled, 4 to 6 hours. 

To serve, ladle into large cups, garnish with cilantro, and serve with pita toast. This soup may be served hot or cold.

Friday, March 08, 2013

The Most Heavenly Vegetarian Sandwich for Meat Lovers: A Non-recipe

Two summers ago, John ate lunch with a work fellow, and he had a memorable vegetarian sandwich. Since he saved a few bites for me (lovely man), I also had a memorable vegetarian sandwich. Now, let it be known that I love meat even though we don't eat it regularly, but this sandwich was tops. Tops! That same summer, I attempted to recreate it with vegetables from our garden, and, not to toot my own horn, I made a pretty mean sandwich. By "pretty mean," I mean "pretty darn near perfect."

(Toot.)


To begin, here's an ingredient list:
Oh, wait.  It was TWO SUMMERS AGO.  I don't remember the exact amounts, so you're on your own here.  Do you like how I absolve myself of any liability if your sandwich doesn't turn out pretty darn near perfect?

-two red peppers, roasted, with seeds, ribs, and skin removed, then cut into strips
-one average-sized eggplant, sliced into 1/4- 1/3-inch slices (next time I'll also peel the thing)
-one enormous onion, sliced into thin rings (I used yellow, but I wish I'd grown a gourmet red)
-fresh garlic, many cloves, minced
-fresh basil, cut chiffonade
-balsamic vinegar
-salt
-pepper
-a bit of sugar
-extra virgin olive oil
-free WILD MUSHROOMS! (...or any kind of mushroom, or mushrooms you have to pay for, or omit the mushrooms entirely. You decide.)
-crusty, dense bread given to you by your mother (It could be either purchased or baked bread, I suppose, but I can't guarantee the results if it's not bread given to you by your mother.)


First, roast your peppers. Google instructions if you've not done it before. I'm too slothful to show you anything but the final product.


Toss eggplant slices in a bowl with balsamic vinegar, basil, minced garlic,


Stir in the roasted red peppers.


Go into the woods and search for wild mushrooms OR grab your free jar!  (Or buy one, but, again, I can't guarantee the results.)  Dump as many drained mushrooms as you like into the bowl and stir together to coat.  Season it all with salt, pepper, and sugar, to taste, and then spread in a single layer on a rimmed baking sheet.  Bake in a hot oven (400 degrees?) until eggplant is soft and the rest is hot and steaming.


While the eggplant is baking, take your sliced onion, throw it in a frying pan with a couple of teaspoons of extra virgin olive oil, and cook until onions are caramelized, adding salt and stirring as needed.

When onions are finished, toss with the eggplant mixture in a big bowl, lightly toast your crusty bread, and top with a hearty mountain of the eggplant mixture.


Top with a second slice of bread if you want, and then act like Dagwood.
Watch out.  It may be messy.


Thursday, March 07, 2013

Kale, Sweet Potato, and Caramelized Onion Pizza

Buildabelly doesn't accurate reflect my family's diet, but, hoo boy, I wish it did!  We'd eat lots o' meat (MEAT!), cheesecake, butter, butter, butter....more butter. Did I mention sugar? Sugar, sugar, sugar.  Sadly, our diets are more lackluster and barren. (What?  Our diet is cheaper and healthier?  Who cares!)  We do have pizza on most Friday nights, which, in summer, we top with all manner of garden vegetables, but in winter, it's cheese pizza every blessed week.  Once in a while I toss on roasted broccoli or caramelized peppers and onions, if we find a good sale, and there's the occasional white spinach pizza for good measure.  Yummy.  Boring.

 Enter kale and sweet potato pizza, a riff on this recipe.
Before you proceed, let it be known that while John and I loved it, the girls would have preferred yummy, boring cheese pizza, but what do they know?


Ingredients:

-Your favorite pizza dough recipe (I used 50/50 mixture of white and whole wheat flour)

Topping:
-2 sweet potatoes, sliced thinly (I use a mandoline slicer) tossed with 2-3 tsp. olive oil and a hearty sprinkling of sea salt.  Spread in a single layer on cookie sheet and oven-bake at about 400 degrees 'til centers are soft and edges are lightly golden crisp (in my oven, this only takes 10 minutes or so for thin slices)
-2 onions, sliced into thin rings and caramelized with  2-3 tsp. olive oil 'til sweet and golden brown.  Add salt and pepper, to taste.
-6-7 cloves fresh garlic, minced, and added to onions for last several minutes of cooking until soft
-several generous handfuls kale, torn and ribs removed, tossed with 1 tsp. olive oil, 1 tbsp. or so balsamic vinegar, and a hearty pinch of sea salt
-shredded mozzarella

Onto your unbaked pizza crust, spread the caramelized onions, spread the kale, layer the sliced sweet potato slices, and top with shredded mozzarella cheese before baking as you usually do.  (High heat oven, baking stone, cookie sheet...you pick!)


I had intended to add some ground rosemary to this, also, but I plumb forgot.  Next time I will, because (sorry, girls) I will be making this again!


Friday, August 19, 2011

Spicy (or Not-so-spicy) Summer Stirfry a.k.a. You Should Make This Tonight!


I think we just ate my favorite stirfry yet, probably because it's a garden-harvest-vegetarian riff on Martha's beef bulgogi recipe from five years ago, and with the addition of sesame oil. (I'm sorry for the weird color cast; I took this picture at dusk because I was too busy eating beforehand.)

This is a sweet-spicy-sesame-y stirfry that tastes...um...simply smashing! So lame, I know. Sometimes I have alliteration spasms. It's a disorder. (ASD.)

Cook up some brown rice. During the forty minutes you wait for it to cook, gather

a few tablespoons olive oil
one onion, chopped
about 4 carrots, thinly julienned

1 small-medium zucchini, thinly julienned
1 small-medium yellow summer squash, thinly julienned*
about 5 cups sugar snap peas (the eat-the-pod-and-all kind), strings removed
2 tbsp. freshly minced garlic (about 12 cloves)
1 and 1/2 tbsp. finely chopped or grated ginger
3/4 cup soy sauce
1 tbsp sesame oil (or more, if you like a really heavy sesame flavor)
6 tbsp. brown sugar (a bit more or less, to taste)

1 tbsp. cornstarch dissolved in a few tablespoons of cold water
ground cayenne or red pepper flakes or fresh hot peppers (ribbed, seeded, and chopped), to taste

In a few tablespoons of olive oil, saute the onions and carrots until the onion is translucent and carrots are nearly crisp-tender (if using fresh hot peppers, add then in, also). After mixing the soy sauce, sesame oil, and brown sugar in a small bowl until sugar dissolves, add the next eight ingredients with 1/3- 1/2 cup water to the pan and cook over medium heat until vegetables are crisp tender. Stir in the cornstarch/water mixture and cook until sauce thickens. Add cayenne or red pepper flakes to taste.

We loved this, especially the sweet crunch of the sugar snap peas.

*A mandoline slicer really does beat all. John picked mine up for ten bucks several years back, and I've been using it to slice and julienne like one obsessed, which is probably because I am obsessed. Mine looks similar to this, except that it didn't cost forty dollars. If you find one for a reasonable price, grab it! They are just about as handy as hands.

Tuesday, August 16, 2011

Oven-baked Zucchini Fries (Are Not Really Fries)


I don't care how many people call them such, zucchini fries are not fries. They are, however, very tasty zucchini sticks. Actually, they're not sticks, either.

Solid straws?
Skinny planks?
Thin logs?
Thickly julienned portions?

I've never deep-fried these before, but given my admiration of fried foods, I can't imagine it would hurt. Does frying ever hurt anything?

Anyway, here is your recipe* for oven-baked zucchini, skinny-sliced-planky-strawed-fries. NO! NOT fries. Whatever. Just eat them! (They are really, truly delicious.) They are, in fact, quite similar to my non-recipe for breaded zucchini slices, only better.
*Here's a confession. I can't find the scrap of paper I jotted the ingredient amounts on as I tossed them in, so the ingredients aren't accurate, but I think they're pretty close. If I find the paper, I'll edit this, but, for now, just use your judgment. It's not rocket science, after all.


If you want enough zucchini for your entire family to eat for lunch (paired with nothing else but dipping sauce), as well as a few handfuls for your mother and sister, as well as a plateful to stick in the fridge, then take

2 medium-large (okay, leaning on the "large" but not yet "baseball bat") zucchini and cut them into "fries."

They can be as thick or thin as you like. I cut more thick than thin because I was in a hurry, but thinner sticks will be crunchier in the end. In a large bowl, mix about 1 cup all-purpose flour with some salt and pepper.

In a medium bowl, mix about 4 eggs and a few tablespoons of milk.

In a large bowl dump
about 4 cups of bread crumbs (I make my own from stale Italian bread, which of course makes plain bread crumbs. If you use seasoned crumbs, decrease spices to suit your tastes.)
about 1/2 cup parmesan cheese
1 and 1/2 tsp. garlic powder
1 tsp. onion powder
1 tsp. salt
1/2 tsp. black pepper
a dash of ground cayenne
a bit of ground paprika
any additional spices you desire
(ground rosemary, Italian seasoning, basil, thyme, etc.).

Preheat the oven to 400 degrees and drizzle a rimmed baking sheet (or two or three) with extra virgin olive oil.

First, dump the zucchini sticks into the bowl with the flour mixture and stir until the sticks are coated. Second, dip the zucchini sticks into the egg mixture. Third, dredge the sticks in the bread crumb mixture until well-coated. Fourth, place them in a single layer on your oiled baking sheet and bake at 400 degrees until browned on the bottom. Flip them and cook for a few additional minutes until browned on all sides and crisp-tender. The total time will depend on how thinly or thickly you slice the zucchini.

While making these, I thought that they'd probably also be yummy flavored with lemon pepper and dill weed paired with a garlic-y tzatziki sauce for dipping. Yum. And then I thought I could dip them in a butter/honey mustard mixture before dredging them in bread crumbs and serving them with more honey mustard, of course. Double yum. I guess I think too much about food when I'm cooking food.

Oh, yes. I made a quick red sauce for dipping by pureeing one quart jar of home-canned tomatoes with one small can tomato paste, salt and sugar in nearly equal amounts to taste, and then rosemary, basil, oregano, parsley, and thyme, to taste.

Enjoy!

And because food pictures just wouldn't be the same without the Hand of Mystery, here's Luci.


Cheesy Zucchini Fritters

Of course, they're healthy. Why do you ask?

These are extremely flavorful, and they use quite a lot of zucchini, which is good news to all of you gardeners around this time of year. Quit leaving zucchini on people's doorsteps and in unlocked cars, already! You should make piles of these greasy fritters, instead.


I gleefully ate four or more of these for lunch and then felt sick for the next hour. They were that good. I'd like to try zucchini fritters that are like potato latkes, except made with zucchini and extra spices, but my first attempt was a bit more...indulgent. The cheeses turn the fritters into royalty, and spices can easily be adjusted to suit your tastes. I recommend serving a pile of fresh vegetables alongside these for lunch. I did not do this, but I bet if I'd tempered the fritters with something less decadent, I would've been fine with my gluttony.

(And once again, I showcase my stellar photography skillz with a cloth napkin and a zucchini blossom. Someday I'll be original, but that day is not yet here.)


2 medium-large zucchini, about ten cups grated
1 large onion, minced
1/4 - 1/2 tsp. dried thyme leaves or about 1 - 1 and 1/2 tsp. fresh chopped thyme
1 tsp. salt
1/3 tsp. black pepper
1 and 1/2 tsp. garlic powder
1 cup all-purpose flour
1/2 cup finely ground cornmeal
2 eggs
3/4 cup parmesan cheese
3/4 cup mozzarella cheese

Grate the zucchini with a medium hand grater (or whatever you want to use) into a large bowl until you have about ten cups worth and then squeeze out as much excess fluid as you can. Stir in the cheeses and eggs. In a small bowl, mix dry ingredients together and then stir into the zucchini mixture.

Heat a few tablespoons of canola oil in a heavy-bottomed pan over medium-high heat (until flour sizzles) and drop batter into pan in amounts small enough to make fritters about the circumference of an orange. Fry until the bottom side is golden brown, flip, and cook the remaining side until golden brown and cooked through.

The only downside to these cheesy fritters is that it might take a fritter or two to get the knack of flipping them without them falling to pieces. Once the mozzarella cheese melts, the stability of the fritter is shaky until it's cooked enough to gain a bit of firmness, and I found smaller fritters easier to flip than the big ones. I like the zucchini ratio to be equal to or greater than the pancake amount, but if you're really struggling, just add some more flour, cornmeal, and spices, to suit.

Thursday, August 11, 2011

Double Chocolate Spiced Zucchini Muffins with Cayenne A.K.A. We Love Zucchini!


So, one might think that two zucchini recipes in one day is enough. Try telling that to the zucchini plants, will ya?! Here's a recipe I created this morning. It's a twist on the traditional and decadent chocolate zucchini cake, only more muffin-like, and with the addition of cayenne, because I like the complexity it adds and the lingering hint of heat. If you don't like these things, then omit it, and the cinnamon, nutmeg, and cloves will step up.

We also like to call this

Dessert for Breakfast.


3 eggs
1 cup brown sugar
1/2 cup melted butter or canola oil
3/4 cup buttermilk (I've never in my life used real buttermilk. It's tacky, but you, too, can substitute 1 tablespoon vinegar and enough milk to equal one cup for buttermilk. Let sit for five minutes until curdled.)
1 and 1/2 tsp. vanilla extract
2 and 1/2 cups grated zucchini (with any excess liquid left at the bottom of bowl after grating)

3/4 cup baking cocoa
2 and 1/2 cups flour
a generous 1 tsp. baking powder
1/2 tsp. baking soda
1 tsp. salt
1 tsp. cinnamon
1/2 tsp. nutmeg
1/2 tsp. cloves
a few shakes ground cayenne, if desired, to taste
1 - 1 and 1/2 cups semisweet chocolate chips


Cream together the eggs and the sugar before adding the remainder of wet ingredients. Stir in shredded zucchini. In a large bowl, sift all dry ingredients. Make a well in the center and add the wet ingredients, stirring until moistened. Spoon into greased (or papered) muffin tins, and then sprinkle the tops with a layer of semisweet chocolate chips. Bake in a 350 oven for about 15-20 minutes, or until an inserted toothpick comes out clean. (My oven runs hot, and it took about 12 minutes; bake these as long as it normally takes you to bake muffins.) Yield: About 1 and a half dozen

Eat them warm.
Eat them cold.
Eat them with your trousers rolled, Mister Prufrock.


Crispy Kale, Or, Oven-Roasted Kale


I've talked about this before, hence this short zip-a-dee post. The girls gobble bowls of crispy kale like they're bowls of potato chips, and, truth be told, their mother does, too, though she wouldn't dare admit it in the public forum of a blog. (So shhhhh.)

Steps 1-5:

1. Step outside, walk to your garden, and pick some kale.
2. If it's large, tear the leaves from the stem; if small and tender, leave them whole
3. Toss kale in a large bowl with several drizzles of extra virgin olive oil and many shakes of salt
4. Broil in your oven for several minutes, stirring midway, until slightly browned and crispy.
5. Watch your children eat it all in one minute flat.

And just because I've also talked about this before, here's Luci's hand.


And Luci herself.


*A few tips:
1. Kale does not take long to scorch and burn. It can take seconds, really, so keep a close eye on it.
2. Kale shrinks considerably in the oven, so what you may think is a giant's portion is truly only a 3 year-old's portion.
3. Crispy kale does not taste like potato chips, but it doesn't have to in order to be yummy.

A Delicious Mess of Pottage

...or thereabouts, Esau.


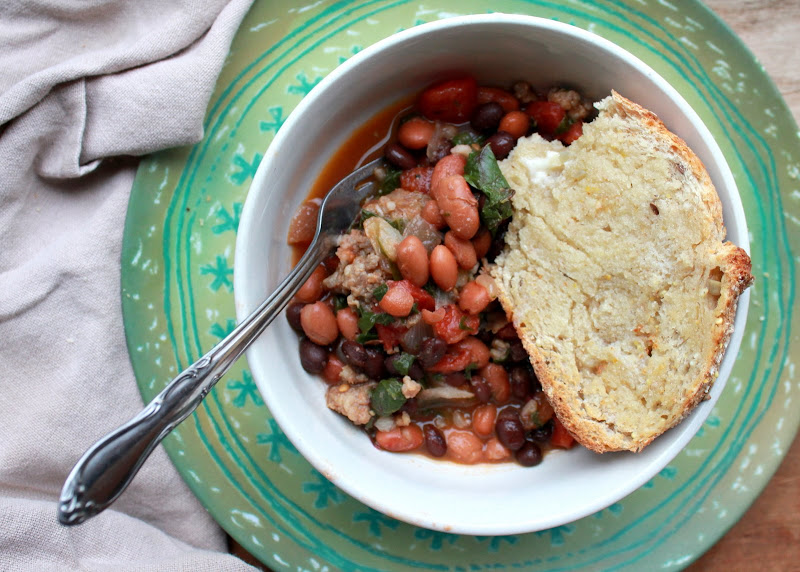
A mess of faux pottage is prepared similarly to kale and beans, only with a mixture of pinto and black beans, the addition of diced tomatoes, beet greens in place of the kale, and ground rosemary, to taste, added to the onions, garlic, salt, and pepper. Important, as well, is the addition of 2 small links of sweet Italian sausage I found in the bottom of our freezer. Cook the sausage at the same time as the onions, and proceed from there.

I used more water in the pot than usual in order to make a flavorful broth. Chicken broth would taste good, as well.


The broth necessitates some buttered, crusty bread for mopping. Don't forget!


Sunday, June 26, 2011

Eggplant (or Zucchini!) Parmesan & Pasta


This lackluster snapshot is from last summer, but don't let it keep you from making the dish!

Dude has made this for us for the last two summers, and he learned how to make it from a bonafide Italian friend, about whose culinary talents an entire blog could (nay, should!) be written.

I've made it with both eggplant-- which is more typical and with which you may be familiar--and....here's the great part...ZUCCHINI! Any gardener knows why I'm ecstatic that this can be deliciously reproduced with zucchini. I love zucchini- love it- but even I reach the point when I look at overachieving zucchini plants and am tempted to just throw some of the baseball bat suckers in the weeds and be done with it. Since my pitiful eggplants are still more seedlings than plants, I'm afraid the zucchini version is most prominent in my future.

Here's a vague ingredients list. (Sorry, this is a whip-together meal. No precise measurements needed.)

You'll need
-Eggplant or zucchini
-A few eggs
-Some milk
-Bread crumbs and spices of your choice
-Parmesan cheese
-Shredded or sliced mozzarella cheese
-Fresh basil leaves
-Red sauce/spaghetti sauce of your choice
-Pasta of your choice
-A pot
-Some water to boil in your pot

If you make your own pasta sauce, it might serve you well to make it first. I usually fly by the seat of my pants with sauces, but my red sauce is a similar version to this pizza sauce, only with more garlic and less (or no) red pepper, and I use home-canned tomatoes in indiscriminate amounts, sometimes adding tomato paste for thickness.

Take eggplant or baseball bat zucchini and slice into 1/4- 1/2-inch thick coins. Place in a colander over a bowl and sprinkle with about a teaspoon of salt. Let sit for an hour to draw out excess moisture. (I usually skip this step with the zucchini. Horrors!) Pat dry and dip in an egg wash. The amounts will vary according to how much eggplant/zucchini you want to bread, but a rough rule is a few tablespoons of milk for each egg. Whisk together in a small bowl.

Take the egg-dipped vegetable slices and dredge them in your choice of bread coating. I usually use plain homemade bread crumbs mixed with a bunch of Parmesan cheese, along with salt, black pepper, garlic powder, and Italian seasoning, to taste. To up the ante, if it's summertime, and you've got fresh herbs growing, chop those and add them in place of the dried Italian seasoning (parsley, sage, rosemary, and thyme, basil, etc.).

To save time, at this point preheat the oven for broiling.
Also, begin boiling water in a pot in preparation for cooking pasta.
Add pasta as soon as the water is ready, and drain it when it is cooked al dente.

Meanwhile, in a heavy-bottomed frying pan, fry the vegetable slices in a few tablespoons of olive oil until crisp-tender and golden brown, flipping once. Drain on paper towels before placing on a cookie sheet. Spoon some sauce over each slice, layer with shredded mozzarella cheese (or, if you're fancy, mozzarella slices) and top with a large basil leaf. Place in oven and broil until cheese is melted.

Place a mound of your desired pasta on a plate, top with breaded eggplant/zucchini slices, and spoon red sauce over all. Eat, eat, eat. EAT!

I cannot begin to tell you how much I am craving this right now.
Zucchini plants, hurry up!

Dorothy Golden's Potato Latkes (Potato Pancakes)

The Owens love potatoes.

The King of the House spearheads this love and prepares potatoes in every possible incarnation of deliciousness, but I am proud to say that I, along with the help of a sweet woman named Dorothy Golden, introduced him to one of his favorites.

Seven years ago, living with our children in this little apartment, I read the newspaper and clipped an unassuming recipe. Observe:


Latkes are traditionally prepared during Hanukkah and often are served with sour cream and/or applesauce. If, like us, you are not Jewish, you eat them as the most delicious cousin of hash browns in the universe, whenever you choose. (And if you are Jewish, you think I'm a dummy for not knowing about these exquisite potatoes until I was 25 years old.)


Also, contrary to appearances and despite the fact that this is the THIRD recipe in a row that features frying something edible, our family doesn't eat fried food often. We eat the following about four times a year, but if I made them every week, we'd eat them every week. (Do I sound defensive? Sigh. I know.)


Without further ado, may I introduce you to Dorothy Golden's potato latkes? Please give her a round of applause! (Out of respect, her original recipe is listed first. Please see my personal notes below.)

-5 russet (baking) potatoes, peeled and grated
-1 large onion, grated
-2 eggs
-a generous quarter-cup matzoh meal or flour
-dash of salt
-oil for frying

Combine potatoes, onion, eggs, matzoh meal, and salt. The mixture should have body but add more meal if necessary. Heat about one inch of oil in a skillet until it is hot.

Using a tablespoon, spoon mixture into the oil to make pancakes, leaving any liquid in the bottom of the bowl. Be careful. Pancakes will spatter when they hit the oil.

Fry pancakes until they turn brown and look slightly dry on the edges. Flip them and brown the other side. Pancakes should be crisp. Remove from oil and drain quickly on paper towels. Serve hot with applesauce, yogurt, or sour cream. Serves about eight.

__________________________________________

Alrighty, here's what I do.
Fill a heavy-bottomed pot with several inches of canola oil. Turn on the heat.

Scrub lots of potatoes. LEAVE THE SKIN ON! Using a hand grater, grate into a large bowl along with one or two giant onions.

Add a few eggs, some salt, and enough flour to make the mixture thick enough to shape into patties. USING YOUR USEFUL HANDS, shape the potato mixture into patties while at the same time squeezing out any excess liquid.

Drop the patties into oil that is hot enough to make a pinch of flour sizzle, and fry until golden brown and dry on the edges. Flip over and brown the second side before draining on paper towels. At this point, salt heavily.

I usually place them on a wire rack on a rimmed cookie sheet and put them in a slightly warm oven (about 200-250 degrees) to stay warm and crispy while I fry up the remaining latkes. (This has the added benefit of keeping them out of easy reach. By the time I'm finished, I've usually already eaten my fair share of the product. Testing it, you know...)

You may add any additional spices to the potato mixture that you see fit.
Thank you and you're welcome.


Tuesday, June 21, 2011

You Bet! (Potato Chips.)

I'm on a short break from weeding the flowerbeds, long neglected and pitiful. The only places clear of weeds are those spots where the hens have raked dirt into soft hollows perfect for dust bathing.

So, up to my neck in weeds, I felt the urgent need to put up a post about potato chips. That's me. Saving the world one outdated recipe at a time.

Since I can't justify spending more than a few minutes in Procrastinator's Paradise, here's a no-brainer "recipe" for potato chips.


These are so easy to make and much better than plain chips from a bag. I have yet to experiment to make Salt & Vinegar chips, but if I succeed, I'll feel like a culinary goddess.

First, find some potatoes.
Scrub them, but don't scrub off the skins.

Second, slice the potatoes as thinly as you can. I've done it in the past with a sharp knife and my very own butterfingers, but this time, I realized how dumb I was for forgetting I own something that looks similar to this. John bought a clearance slicer for me many years ago, and I don't use it as often as I should. It slices the potatoes in uniform, extremely thin slices. Consumers, go buy one today!

Okay, step number three. Fill a heavy-bottomed pot (or a fryer) with several inches of canola oil* and heat until a pinch of flour sizzles when you drop it in. If the flour doesn't sizzle, the slices will soak up oil and be soggy, so wait for the sizzle! (*It doesn't have to be canola oil, but canola oil has a high burn point and it's high in monounsaturated fats, so win-win.)

Step four. Fry potato slices in sizzling, sizzly oil until golden brown. Drain on paper towels or a wire rack, or on paper towels on a wire rack.

Step five. SALT HEAVILY. QUICKLY!!! I love salt, though, so use your judgment here.

Step six, the most important and complex of all of these complex instructions...

Eat them all before your husband comes home.
Or save five or six for him, like I did.

Insert bland snapshot here.


Sunday, June 12, 2011

Bonus: Sauteed Kale & Beans with Onion and Garlic

...because I still have seven minutes until midnight arrives. (The post title doubles as a simple recipe.)

I discovered a few years back that kale is magic. The girls and I love it, John likes it, and it's extremely versatile. Plus, it's green!

We oven-roast it with olive oil and salt until it's crispy and irresistable, we toss it in soups, we add it to curries, and when we rejoice to find it growing in our not-yet-cleaned-out-from-last-fall-garden, we saute it like this
l
l
l
l
l
l
l
l
V


Loose ingredients for the above dish, which we ate as a meal.

- Onions, lots and lots of onions, diced and sauteed in a mixture of butter and olive oil until soft and translucent
- more fresh garlic than you think you should add, finely minced, added to the onions at the tail end for a minute or so (I probably used 7-8 cloves?)
- beans (your choice; we like pinto or white or kidney), added after the garlic is heated
- kale, torn into pieces, added last with some water, and sauteed/steamed until beginning to soften but not yet limp
- one slice of ham, leftover from the scalloped potatoes (that Papa baked) diced into tiny pieces
- salt and pepper, liberally shaken

(This is probably too obvious to mention, but by all that's good, if you've got bacon, USE BACON, too!)

Not to be a garden snoot, but a friend told me a few days ago that kale from the store tastes far different than home-grown. I've never had it from a store, but if you can, grow your own. Sow some today! It's easy and hardy and so, so delicious. Plus, it's green!

Wednesday, May 14, 2008

Grilled Portobello Mushrooms with Tomatoes and Fresh Mozzerella


When John came home with portobello mushrooms (which I've never bought before) along with exotic ancho chili powder, asparagus, fresh lemons, fresh basil, and mozzerella, I just about fainted. As much as I loved him for taking the task of supper-making almost entirely off my hands, I knew that we'd move to the poorhouse if this was going to be our typical fare. Well, the other recipes from that particular supper have since passed, but after he made this portobello recipe for the third (THIRD!) time, I gently suggested that we should put our tax refund into a locked savings account before we ate it up in portobello form.

If there's no choice but to eat one's tax refund, though, this surely is the best way to do it.

Even if you don't like mushrooms, make the tomato salad and eat it plain. The flavor is simple and fresh and tastes like a spoonful of summertime. Also, use your judgment with the olive oil application.

Recipe courtesy Giada De Laurentiis

3 tablespoons olive oil, plus extra for greasing grill pan
4 large portobello mushrooms (about 5 inches in diameter), stemmed
Salt and freshly ground black pepper
3 tablespoons extra-virgin olive oil, plus extra for drizzling
2 cloves garlic, minced
3 small to medium sized vine ripened tomatoes, cut into 1/2-inch pieces
8 ounces fresh water-packed mozzarella, drained, cut into 1/2-inch cubes
1/4 cup chopped fresh basil leaves
Prepare the barbecue (medium-high heat).
Drizzle 3 tablespoons of olive oil over both sides of the mushrooms. Sprinkle the mushrooms with salt and pepper. Drizzle olive oil on grill pan to prevent mushrooms from sticking. Grill until the mushrooms are heated through and tender, about 5 minutes per side.

Meanwhile, whisk the extra-virgin olive oil and garlic in a medium bowl to blend. Add the tomatoes, cheese, and basil and toss to coat. Season the tomato salad, to taste, with salt and pepper.

Place 1 hot grilled mushroom gill side up on each of 4 plates. Sprinkle with more salt and pepper. Spoon the tomato salad atop the mushrooms, drizzle with extra-virgin olive oil to finish, about 1 tablespoon and serve.

Grilled Asparagus with Lemon and Garlic


I've never eaten asparagus before, or, if I have, I have no memory of doing so. I now have John, our personal chef, to thank for my first (and second and third) helping. This was a yummy introduction to them, and the girls even gobbled them. It may have helped that John took Annie's cue and called them green beans...


My only change if we made this again would be to add more garlic and lemon zest. Their flavor was delicious and present, but I wanted even more of it!

1 pound asparagus
3 tablespoons olive oil
2 cloves garlic, finel
y minced
1 teaspoon grated lemon
zest
1/4 teaspoon paprika
Salt and freshly ground black pepper.

Trim asparagus. In a small bowl, combine oil, garlic, zest and paprika and stir with a fork. Lay asparagus side by side and pierce on 2 wooden skewers to form a raft. Place rafts on the grill and brush with oil mixture. Cook to desired tenderness and season with salt and pepper.

Seasoned Grilled Potatoes


Sometimes I think our family has eaten potatoes just about every possible way, but this was a new incarnation, thanks to the unique taste of the ancho chili powder that seasons them. Smoky, flavorful, and just plain good. Oh, humble potato. We love you.

Recipe courtesy of Bobby Flay. Potatoes for supper courtesy of my husband.

3 pounds Idaho potatoes
1/2 cup canola oil
2 tablespoons ancho chili powder
1 tablespoon kosher salt
2 tsp. ground cumin.

Cover the potatoes with cold water in a large saucepan and cook until almost tender. Drain and dry the potatoes. Cut each potato lengthwise into quarters. Place the potatoes on a baking sheet and brush both sides of the potatoes with oil. Combine the chili powder, salt, and cumin in a small bowl, and sprinkle over the potatoes. Grill the potato wedges for 3 to 4 minutes per side until golden brown.

Wednesday, March 26, 2008

Streusel-topped Cheesy Broccoli

I really liked this broccoli, and it's my new favorite way to eat little trees. It's much more flavorful than the typical cheesy broccoli casserole, due mostly to the savory streusel topping seasoned with garlic, onion, spicy mustard, and parmesan.


1 to 1 and 1/2 pounds of broccoli florets

Streusel Topping
2 tablespoons butter
3-4 garlic cloves, minced
1 small onion, chopped
1/2 teaspoon mustard powder
1/2 -1 tablespoon spicy brown mustard
@ three slices of fresh bread (I used oat) broken into smallish crumbs
Parmesan cheese, salt, and fresh ground pepper, to taste

Cheese Sauce
4 tablespoons butter
4 tablespoons flour
@ 2 cups milk
4 oz. sharp cheddar cheese
salt, freshly ground pepper, ground cayenne, and ground nutmeg, to taste

Cook broccoli in boiling water for about 3 minutes until slightly cooked but still firm. Drain and set aside.

Saute onion and garlic in butter over medium-low heat until onion is translucent. Add the mustards and the bread crumbs. Fry until crumbs begin to turn golden and then season with salt, pepper, and parmesan. Set aside.

For the sauce, prepare a basic white sauce by melting the butter in a pan and then stirring in the flour. Whisk in the milk and cook over medium heat until the sauce thickens, whisking constantly. Season with salt, pepper, nutmeg, and cayenne and add the grated cheese. Stir until cheese has melted and is incorporated completely, forming a smooth sauce.

Layer the broccoli in the bottom of a baking dish and spread the cheese sauce on top before sprinkling the bread crumb topping over it all. Bake in a 350 degree oven for about 30 minutes or until the topping is nicely browned and toasted.


I added more mustard, garlic, etc., to taste as I made this, and the cheese sauce is just a guide. I usually just wing cheese sauces, so I'm not entire sure how much milk I added. It wasn't as thick a sauce as I'd normally make, but since it had additional baking in the oven, it turned out to be a perfect consistency.